How to avoid getting your Facebook account hacked

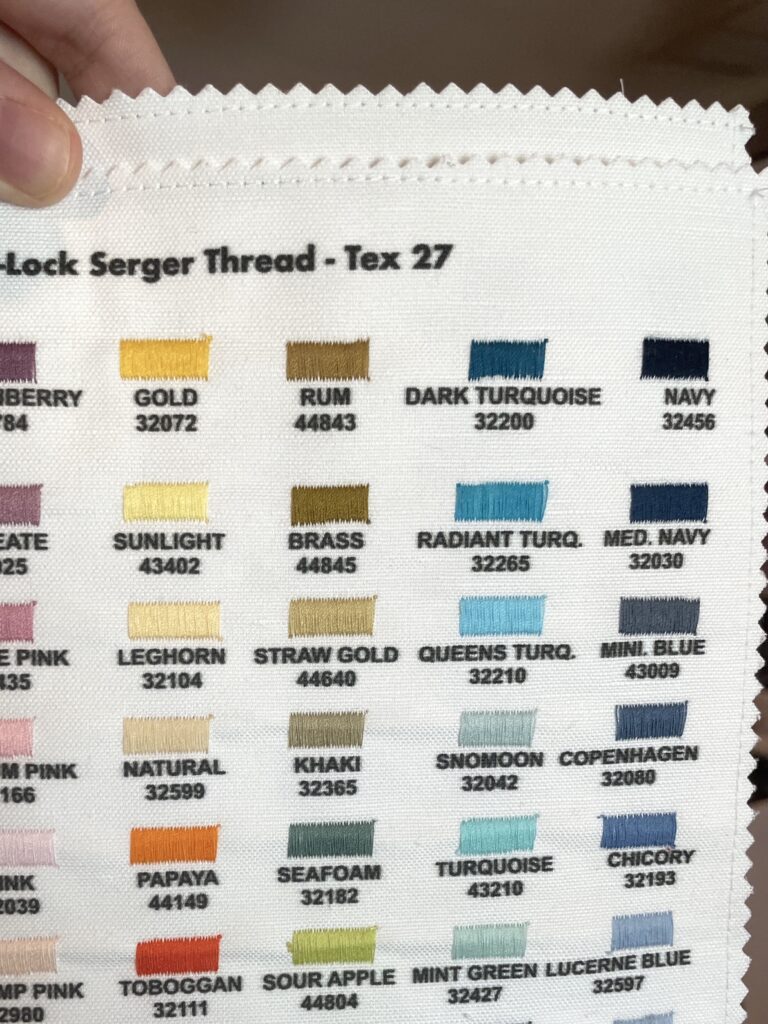
I am a tech-savvy person, and of no importance or influence, haha; so I was very surprised (and annoyed) to have become a victim of a recent Facebook hacker. No idea if this was an individual, bot, organization, whatever. All I know is I already had 2-factor authentication set up (which means, you need to confirm your identity on a separate method when logging in on a new device), but my backup method was by SMS text message, which apparently can be intercepted and used by the hacker to gain access to your account.

I received an email overnight that said someone was trying to log in from a new location, followed by a text at 3:30 AM with a confirmation code. They somehow used that code to get access to my account, add their email as a secondary email (I see it when I try to log in, but it’s mostly obfuscated so I don’t know the actual email address), and changed the 2-factor authentication to use a separate encrypted app, so now I no longer receive the codes to log in; they do. They also cleared my recent logins, so I don’t have any active logins anywhere to reset my settings, and everything is treated like a new device.

First, if this happens to you, report it and secure your account immediately, so they can’t continue logging in. It then has you send them a picture of your Photo ID, but it says it can take weeks to review (if they decide to review it at all).

To avoid this happening, on your Facebook app (not web version), go to your privacy & security settings; under Settings, find the option for 2-factor authentication, and turn it on. Set the Authentication type as Authentication App (NOT SMS).

To finish this process, you’ll need to download a 3rd party encrypted authenticator app. Microsoft has a good one (Microsoft Authenticator), or you can use Google Authenticator or LastPass Authenticator, etc. One that you trust or already use.

Then you say on Facebook to show you a code, copy that code, and paste it into your authenticator app as a new account.

Now, when you log into Facebook for the first time from a new device, you will have to open up your separate Authenticator app to get the 6 digit code to enter. It is far more secure than receiving it over SMS.

NPR had a story about this issue recently; it’s happening to a LOT of people lately so please take a few seconds to upgrade your security, or your account is at risk and you may not get it back. https://www.npr.org/2021/08/02/1023801277/your-facebook-account-was-hacked-getting-help-may-take-weeks-or-299

Maxi-Lock Serger Thread Sample Cards

A whole bunch of sample cards

Ever get a crazy idea, and then do it?

I was tired of ordering (and returning) Maxi-Lock serger thread (Tex-27 and Maxi-Lock stretch) because it wasn’t anywhere close to the color pictured on the website. Wawak was kind enough to send me a printed sample card, which was closer than online, but it still wasn’t accurate enough. I was tired enough of it that I ordered one cone of every color so that I could make my own sample card, and sell enough of them to get my money back for buying all of those cones.

Turns out – it totally works! My initial method used my embroidery machine on Kona cotton to embroider the names and numbers of the different threads. But unfortunately, it took an hour and a half just to machine embroider the text on one card, and then another couple hours to stitch out the actual color samples. Nope. So I ordered some canvas from Spoonflower with the text printed on there for me, and so all I had to do was add some stabilizer and stitch the color samples on. To do 76 color changes, I timed it would take me about one hour (without any stitching; just threading my machine 76 times.) So, I could work on these cards in batches to eliminate how many times I needed to rethread. I had 45 cards printed, and so I decided to do them in batches of 15. It takes me about 10 minutes to stitch one color across 15 cards. Multiply that by 76… plus the prep time with stabilizer and ironing, etc…. yeah I’d rather not do the math either. It’s still a LOT of time that went into these cards, and at $35 each I am definitely not making up for my time. But, I like to think that I’m doing a favor for 44 other stitchers plus myself to have an awesome reference card and never need to return their thread again ?

Prototype card. Took too long, and didn’t look that great. Totally functional, though.

I’m unfortunately sold out of these for good, but below are reference photos taken in natural light to be as accurate as possible for you use if you weren’t able to snag one. Good luck!

Reaching inbox zero a little (or a lot) at a time

If you’re like me, you have a LOT of emails in your inbox. Like, thousands. If you’re also like me, this bothers you, but scrolling through and selectively deleting every email is something you don’t have the time or patience for.

Well, I’ve found a process that helps speed this up, whether you’re trying to sit down and knock it all out at once, or want to just do a little bit each day and make big strides at reducing the clutter.

1. Unsubscribe from mailing lists you don’t care about

This seems obvious enough. (Mostly) gone are the days of being afraid to unsubscribe, because you will be “letting them know” they’ve found a real address. Most companies/individuals use marketing software that will legitimately remove you from the list if you bother to ask.

But what if the emailing lists you are on you do want to receive, so you’re aware of sales, news, updates, etc? Then move on to step 2.

2. Instead of deleting a single email, search your inbox for that term/sender and delete all of the results

The thought is like roaches; if you have one, you probably have a bunch. Now you can save time by deleting things in batches. The trick is to include the in:inbox term to your search phrase. This will make sure you’re only clearing out your inbox; and not your archives or other things you have filed in other folders/labels. It helps to copy “in:inbox” so you can paste it after whatever you type for your next search.

Here I’ve searched for “Kickstarter” (specifically, kickstarter in:inbox). Sometimes I care about these updates when they arrive; usually not. Select all, scroll through the list and de-select anything that you don’t want to delete, and hit that satisfying “delete” button.

LOTS of emails to delete at once. Hooray!

Sometimes this process works perfectly, and you want to delete everything that comes up. Sometimes, your search term turns up some other results. This is actually a good thing, if they happen to be other junk I care to delete. But if the term was too vague and is taking too long to scan for “do I delete it or not?”, the you can also add from: in your search term (like from:kickstarter in:inbox) to narrow it down specifically to that sender. I generally like casting a wide net though, because then i’m clearing out bigger chunks at once than necessarily searching for each sender individually. This can also give you a hint of what term to search for next (definitely going to try Biden in:inbox).

Example of a search term that happened to returned several unexpected results

Then, once you’ve deleted everything appropriate for that term, if there are still any items hanging on that you did want to keep, select all and hit archive. Now everything related to that term is gone from your inbox.

3. It’s ok to let it go ?

This one, if you’re like me, is sometimes the hardest. I’ll admit, I do archive receipts, order tracking, account creation, etc., because occasionally I do need to search “when did I buy that thing?” or “why hasn’t X shown up yet”. But the confirmation of a Zoom meeting I had once? Yeah let that go. Once you start deleting, it feels pretty good.

And that’s really all there is to it! This process is simple and addictive once you see your inbox number dropping hundreds at a time. If you just want to add this habit into your daily routine to clear it out a little at a time, then instead of deleting today’s single junk emails, search your inbox and delete all related junk emails. You can set a daily target inbox number if you want; like today I want to get it below 4500. Then tomorrow, 4000. And without specifically investing a huge chunk of time, you, too, can reach inbox zero.

Or, you may be hooked to the process and knock it all out at once. It goes surprisingly quickly once you get the hang of it! Good luck conquering your towering inboxes.

Scream Inside Your Heart cross-stitch pattern

Download the pdf pattern: one page version for digital use or a 3 page version for printing. Pattern for personal use only; please do not redistribute.

This pattern was inspired by the beautiful work posted by Rachel Burgoon on Facebook, showing a delicately stitched message on a miniature scroll. It translates to “Scream Inside Your Heart,” as posted by a Japanese amusement park to prevent the spread of Covid.

I created this using her recommended technique, creating the calligraphy using the site https://www.kenjisugimoto.com/shuji/  and then used my pattern editor of choice (PCStitch) to turn the image into a pattern.

This pattern area is 31 x 240 stitches, and she stitched it over one on 28 ct fabric, which would give it the final stitched area of ~ 1 inch by 8.5 inches.

Enjoy! Comment if you make this; I would love to see more finished versions!


Gabriel’s Oboe updated parts

I found this blog that has a great arrangement of Gabriel’s Oboe for euphonium ensemble, but some of the parts for bass clef were in the wrong key.

Jack posted the Sibelius file and Midi, so I put them into Finale to generate correct bass clef parts.

Thank you Jack for posting the arrangement! Below are the updated score and parts to download.

Gabriel’s Oboe.musx (Finale File)

Gabriel’s Oboe – Score.pdf
Gabriel’s Oboe – Solo Euphonium.pdf
Gabriel’s Oboe – Euphonium 1.pdf
Gabriel’s Oboe – Euphonium 2.pdf
Gabriel’s Oboe – Euphonium 3.pdf
Gabriel’s Oboe – Euphonium 4.pdf
Gabriel’s Oboe – Euphonium 5.pdf