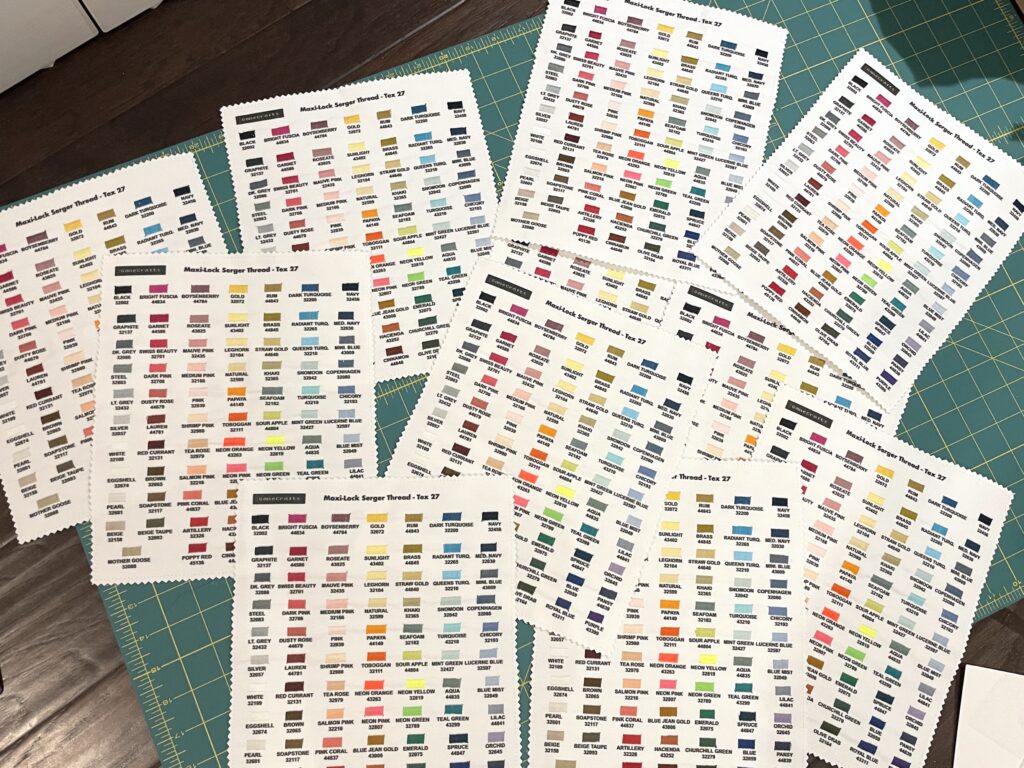
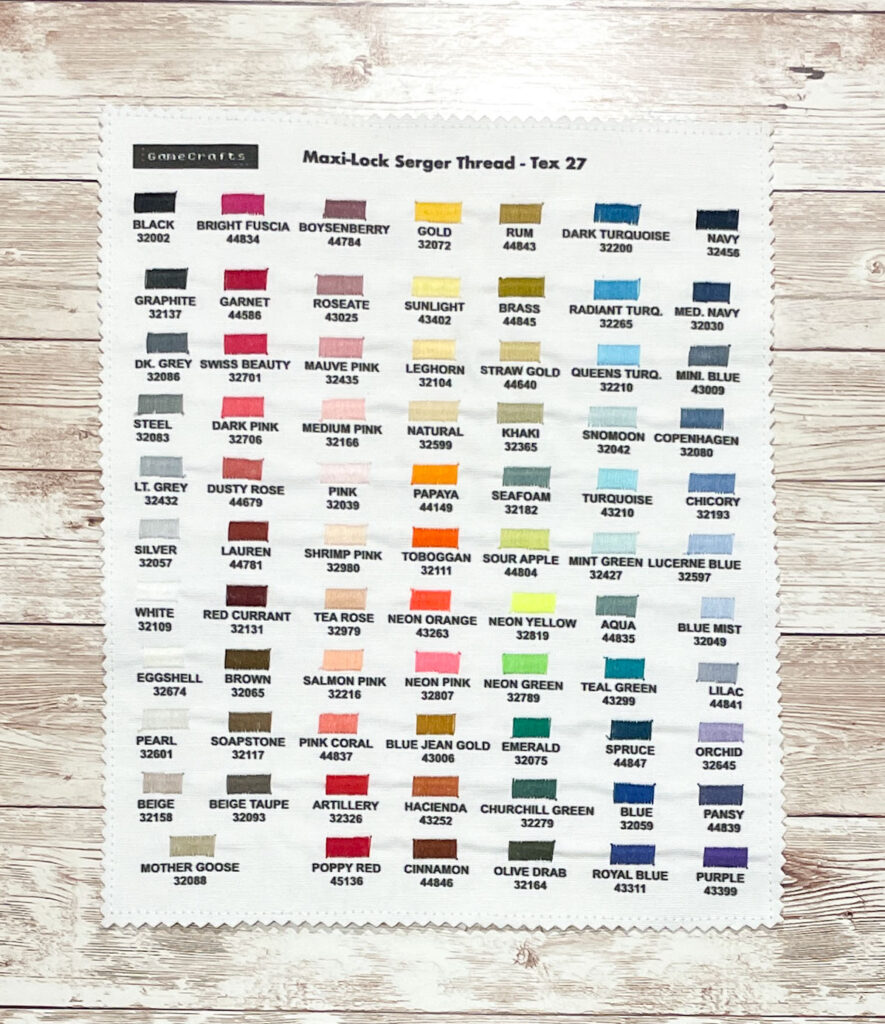
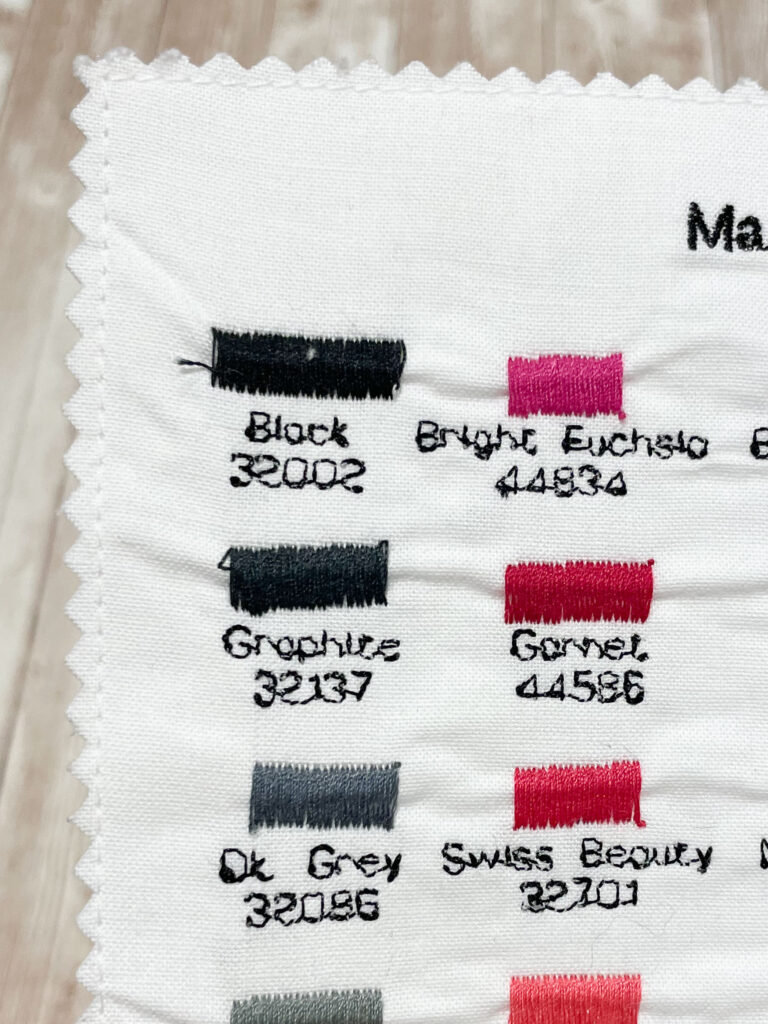
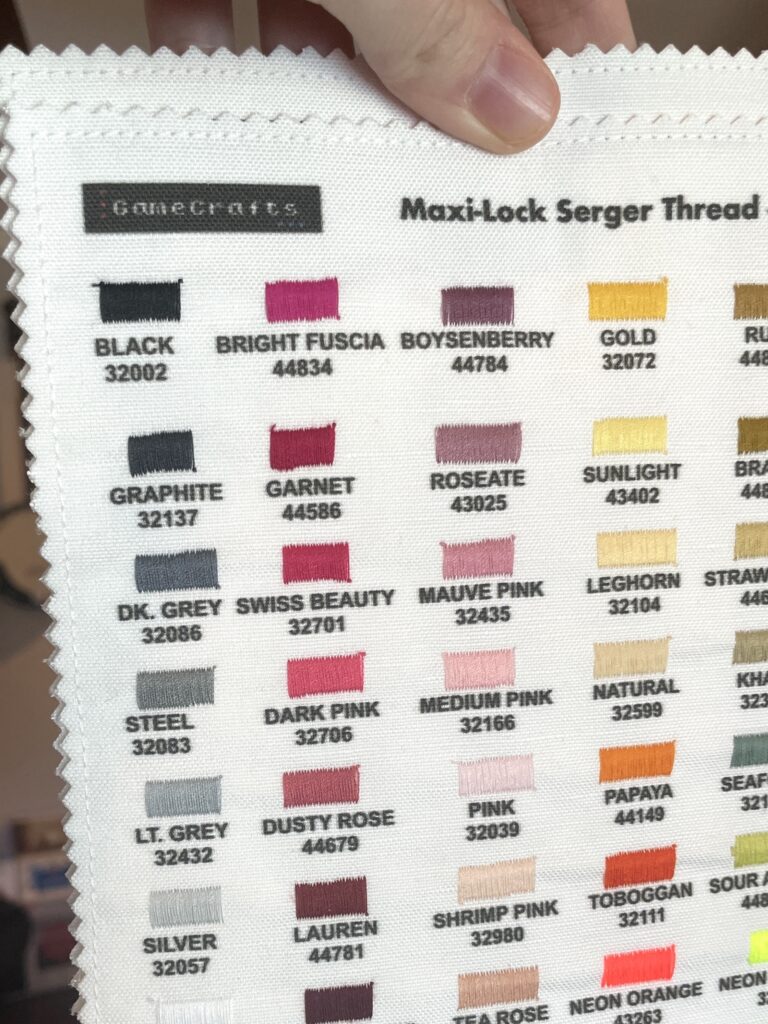
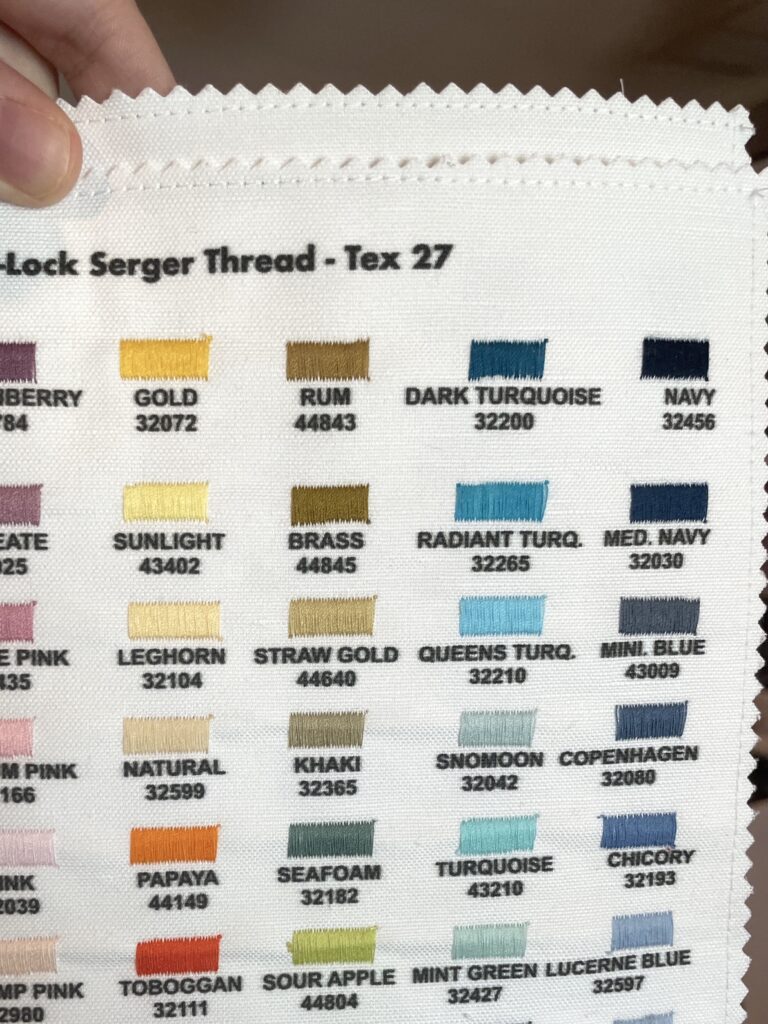
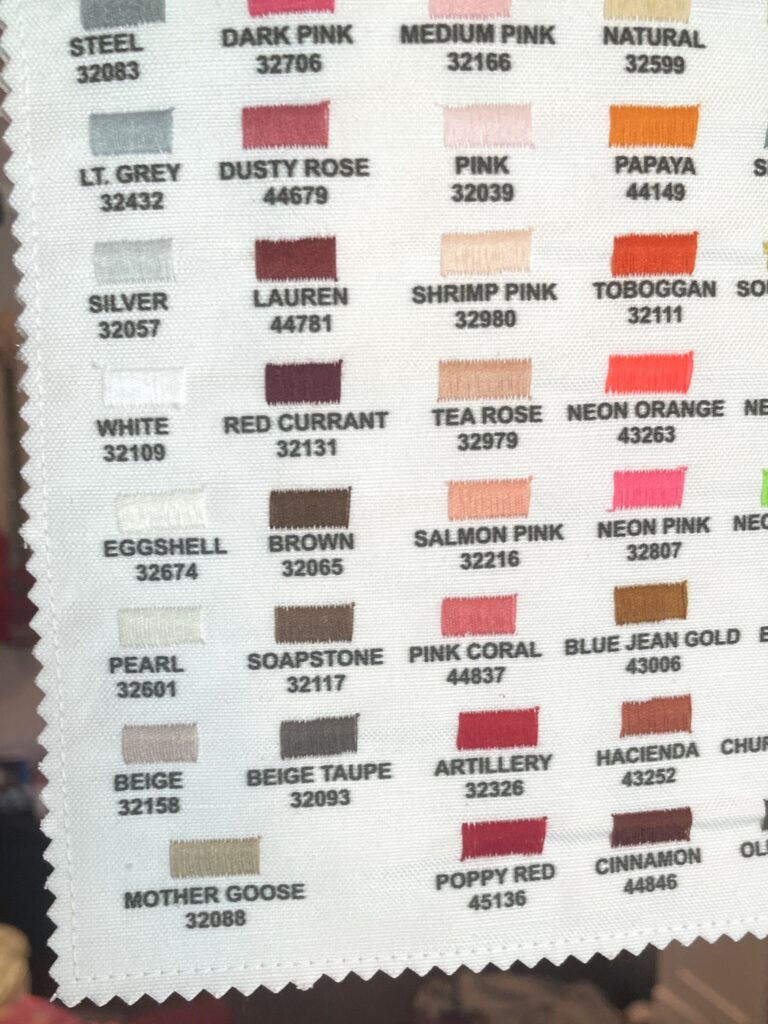
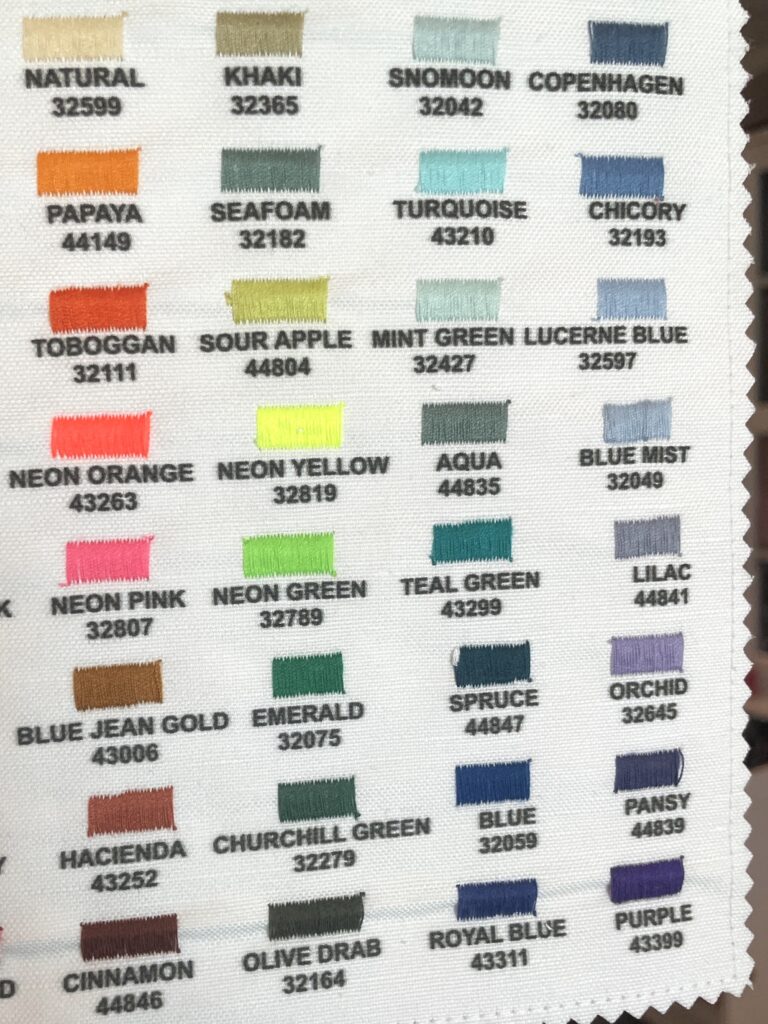
I was tired of ordering (and returning) Maxi-Lock serger thread (Tex-27 and Maxi-Lock stretch) because it wasn’t anywhere close to the color pictured on the website. Wawak was kind enough to send me a printed sample card, which was closer than online, but it still wasn’t accurate enough. I was tired enough of it that I ordered one cone of every color so that I could make my own sample card, and sell enough of them to get my money back for buying all of those cones.
Turns out – it totally works! My initial method used my embroidery machine on Kona cotton to embroider the names and numbers of the different threads. But unfortunately, it took an hour and a half just to machine embroider the text on one card, and then another couple hours to stitch out the actual color samples. Nope. So I ordered some canvas from Spoonflower with the text printed on there for me, and so all I had to do was add some stabilizer and stitch the color samples on. To do 76 color changes, I timed it would take me about one hour (without any stitching; just threading my machine 76 times.) So, I could work on these cards in batches to eliminate how many times I needed to rethread. I had 45 cards printed, and so I decided to do them in batches of 15. It takes me about 10 minutes to stitch one color across 15 cards. Multiply that by 76… plus the prep time with stabilizer and ironing, etc…. yeah I’d rather not do the math either. It’s still a LOT of time that went into these cards, and at $35 each I am definitely not making up for my time. But, I like to think that I’m doing a favor for 44 other stitchers plus myself to have an awesome reference card and never need to return their thread again ?
Prototype card. Took too long, and didn’t look that great. Totally functional, though.
I’m unfortunately sold out of these for good, but below are reference photos taken in natural light to be as accurate as possible for you use if you weren’t able to snag one. Good luck!
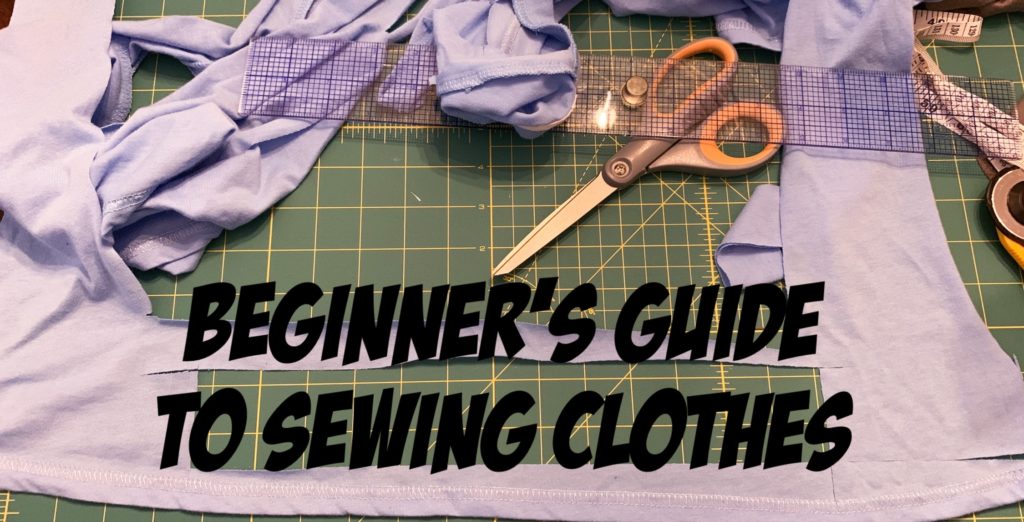
Over the past year, I’ve gotten really into sewing clothes. Mostly kid/baby stuff, but I’ve done some adult pieces as well. In this guide, I’ll attempt to outline some of the tips and tricks I’ve learned over the past year, and I’ll break out any topics of particular length to their own posts.
Fabric Types
It seems appropriate to discuss fabric types first, since that was my first pitfall. My previous experience was only with woven, i. e. non-stretchy fabric, like quilting cotton or flannel. Most clothes are sewn with knit fabrics, which have many different properties (2-way stretch, 4-way stretch, weight, stretch recovery, drape, etc.)
Do not use woven fabric for a pattern designed for knit!
It will come out too small, and probably tear at the seams if you manage to fit it on. Patterns designed for knit fabrics often have some built-in negative ease, which means they’re expected to stretch a little. Think of something like tights; they look super tiny, but stretch a lot when you put them on. If you used a pattern for tights with something like flannel, you’d have a bad time.
Not all fabrics are created equal!
The first time I ordered (cheap) fabric online, I was looking for some grey t-shirt-like material. I found some grey “cotton jersey” on fabric.com and ordered a lot of it. It came back so thin, it was see-through, and didn’t have any stretch recovery; it would get saggy immediately if I used it for a t-shirt. Point being, there’s a lot more to fabrics than their name. This doesn’t mean don’t order fabrics online, but it does mean do so with caution, and either from shops you know and trust their quality, or just get a swatch or small amount until you’re sure it’s what you want.
Also, if you’re sewing a t-shirt for instance, you can often use the same material you used for the body of the shirt for the collar. You don’t have to get “ribbing” unless you want to, or unless your fabric has poor stretch recovery. I recently got a bunch of ribbing to use as edge binding on baby clothes, so I’ll let you know how it goes.
I will go into far more detail about choosing fabrics and the differences in different knit fabrics in a future post: Knit Fabric Types.
Next up would be what you need to start out with. All you really need is a sewing machine. You’ll want to get some “stretch” needles though for knit fabrics; regular or “universal” needles may skip stitches on you. The first thing I started doing was sizing down my own t-shirts (usually XL freebies) to a size that would fit me. To sew knit fabrics with a sewing machine, all you need is a stretch stitch. Most machines have one, check your manual. A triple stitch is ideal, but it can be done without one.
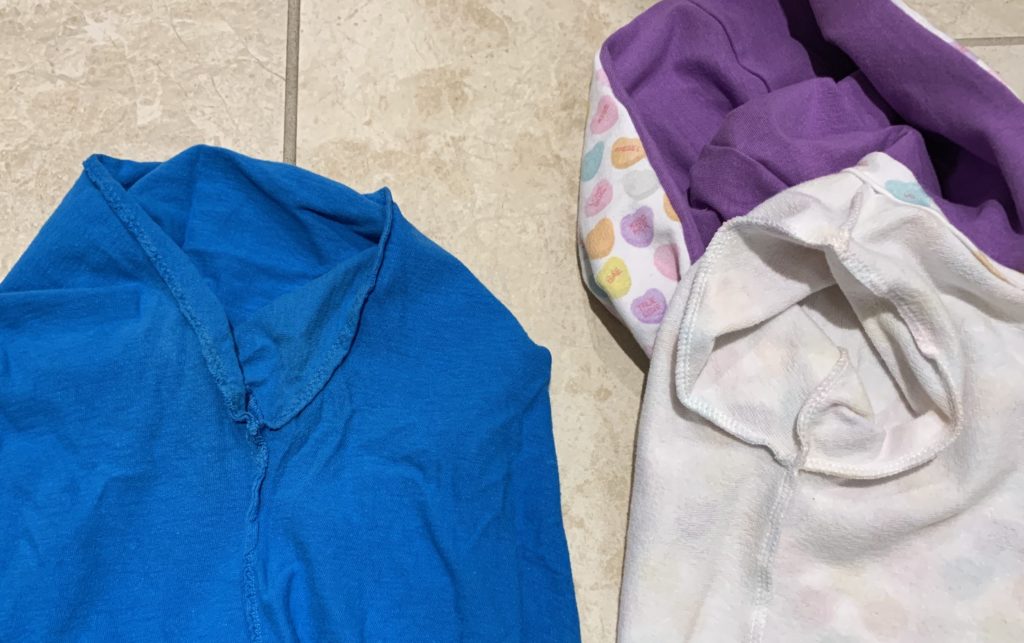
Arm hole sewn with a sewing machine stretch stitch (left) vs. a serger (right)
Once I started sizing down my own shirts to kids size for Amy is when I got more serious about how my seams looked. If you prefer your seams to look more finished and professional, a serger (also called an overlock) is extremely helpful. It makes sewing knit fabrics so quick and easy, you’ll wonder how you ever did it without one. There is a small learning curve to threading it, and to understanding how your seam allowance works (there’s a blade that cuts off the excess past your seam). I use a serger now for all of my internal seams (everything except hemmed edges).
If you’re wanting to go a step further and have a finished hem like ready-to-wear (or RTW; store-bought) garments have, you’ll need a third machine, a coverstitch. This allows you to do nice top seams that stretch. I don’t have one of these yet, but probably will eventually. If you want the look of a coverstitch without a machine, you can kind of get away with it by using a double needle on a regular sewing machine. This is what I’ve been doing; and the double needle isn’t as scary as it looks. Check out some youtube videos on it, and check your machine’s manual to find out if there’s a specific way to thread for a double needle.
If you find that your seams are popping even with a stretch stitch (because your toddler tries to stick their head in the arm hole, for instance…) you can make your seams even stretchier by using wooly nylon in your serger loopers (or bobbin, if using a sewing machine).
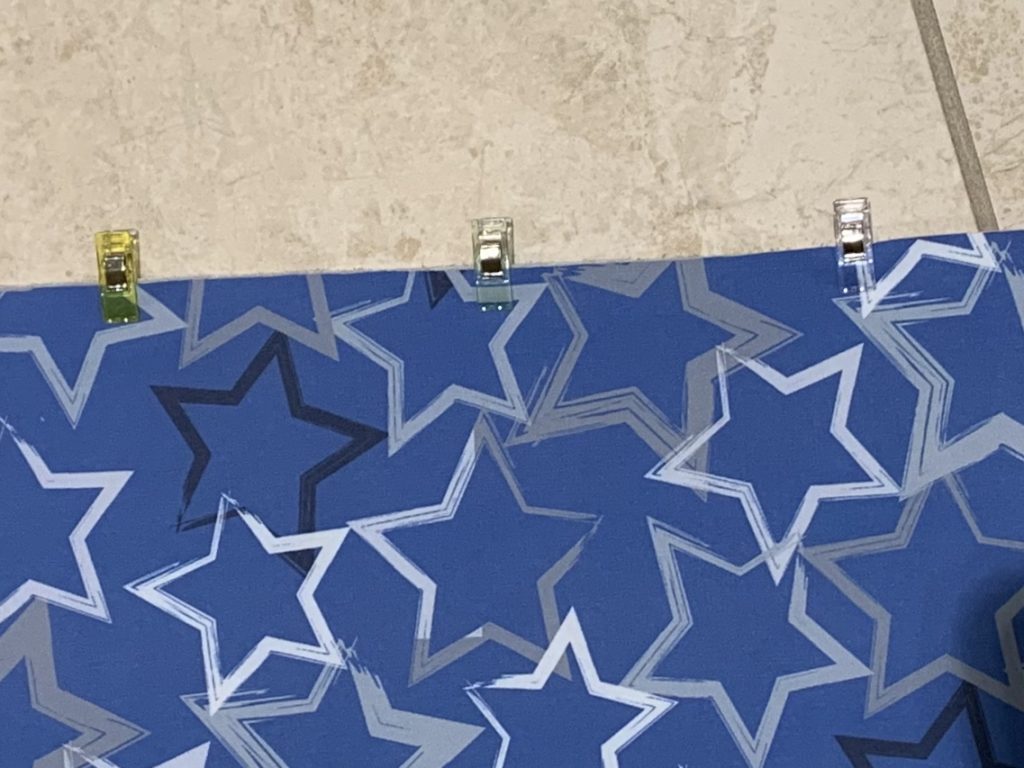
You don’t have to pin; use clips!
I saw all these people using these magical clips and I first thought, “What’s the point? You can just pin it.” Until I bought some, and WOW. So much faster, easier, and more secure than pinning, with no chance of blood! Highly recommend these.
Cutting Tools
You’ll need a good pair of scissors, and I recommend using a rotary cutter and mat. Don’t scrimp on these, having good quality tools here will save you time and frustration. Wait until there’s a good sale, or you have a 40 or 50% coupon to use for them. I use an OLFA rotary cutter and mat (the green one). Get as BIG of a mat as you can; I have a 24″ x 36″ one and for adult clothes, it still isn’t as big as I’d like. Also, make sure it is self-healing; you might assume that all mats are, but they aren’t, and if you use one that isn’t you’ll end up with rough cuts on your fabric wherever it skips over a gouge in your mat. If you’re careful with your blades (don’t cut over paper, don’t press harder than you need to) and get good quality blades they’ll last a while, but if you notice your cuts aren’t going through cleanly, you’ll need to replace your blade.
It will also be super helpful for cutting bands and straight lines to have a quilting ruler; I have a 2″ x 18″ one that works great.
Some people use pattern weights to hold their pattern/fabric in place while they cut, but I haven’t needed to; I just keep one hand holding the pattern in place, and the other on the cutter, and it’s worked out fine. Maybe if I was using only scissors, I’d need them.
Where to get Fabric
Here’s the deal with fabric. Nice fabric is AWESOME. Nice to sew with, lovely to wear, can get wonderful prints… and it’s expensive. Sewing clothes is definitely a hobby; rarely will it be cheaper than buying clothes. So, with that in mind, you can use JoAnn’s or your local craft store for “cheap” fabric as you’re learning so you don’t feel like you’re wasting your “good stuff,” or spending an arm and a leg for projects that may not work out.
Always, always, always prewash your fabric!
As soon as I bring fabric home, or get it in the mail, it goes straight into my washing machine. This way, it’s ready to go when I want to sew with it, and I don’t have to remember to prewash it when I’m excited to start a project. I always wash and dry it on the settings I will use once it’s made into clothes, so if it’s going to shrink, it does it upfront. ESPECIALLY if you’re using JoAnn’s “doodles” brand (kid-print cotton spandex) be sure to buy extra and prewash it two or three times; it will continue to shrink (my yard was down to 27″ after wash/dry #3!). If you don’t prewash and the fabric shrinks after you’ve sewn it into clothes, womp. Have fun gifting it to someone smaller than you intended it to be for.
The other interesting area you can get into online is custom fabric. These groups generally do pre-order rounds, to ensure they have enough interest to run a certain print. After the pre-order is done, they’ll usually have retail of it for a little while, but these patterns often don’t last long, so if you like something, buy it while you can. Then you can get into the slippery slope of destash/buy-sell-trade groups, where on the one hand, you can find one of those out of stock prints, but on the other hand… you can buy way more fabric than you need ?
Once you’re ready to try some “good stuff”, here are my favorite fabric shops:
Raspberry Creek – This has been my go-to. Really nice quality cotton Lycra (great for sturdy t-shirts), 4-way stretch French terry (good for lightweight hoodies or pants), double brushed poly spandex (good for leggings), and wonderful swim fabric. Haven’t had a chance to sew up my swim stuff yet, but it will be coming soon 🙂
PurpleSeamstress – Really inexpensive, good quality cotton lycra solids (save your fancy prints for sleeves/small cuts, and pair it with solid colors to make it last longer). Also has a good selection of double brushed poly.
Jumping June – Getting into some more expensive European stuff here, but the prints are WONDERFUL and they have a great selection of ribbing and cuffs. If you’re up for a gamble, I’ve never been disappointed with a mystery scrap pack or seconds box from them. So, so nice.
Lillestoff – My latest find; again, amazing quality. Site is in German with a so-so translation, haha. But their Facebook group is great, and has an order form on the Facebook group to get cheap shipping (instead of paying the full international cost from their website).
So Sew English – Huge selection; good quality. Their mystery box is more of a gamble, because their inventory is so much more broad.
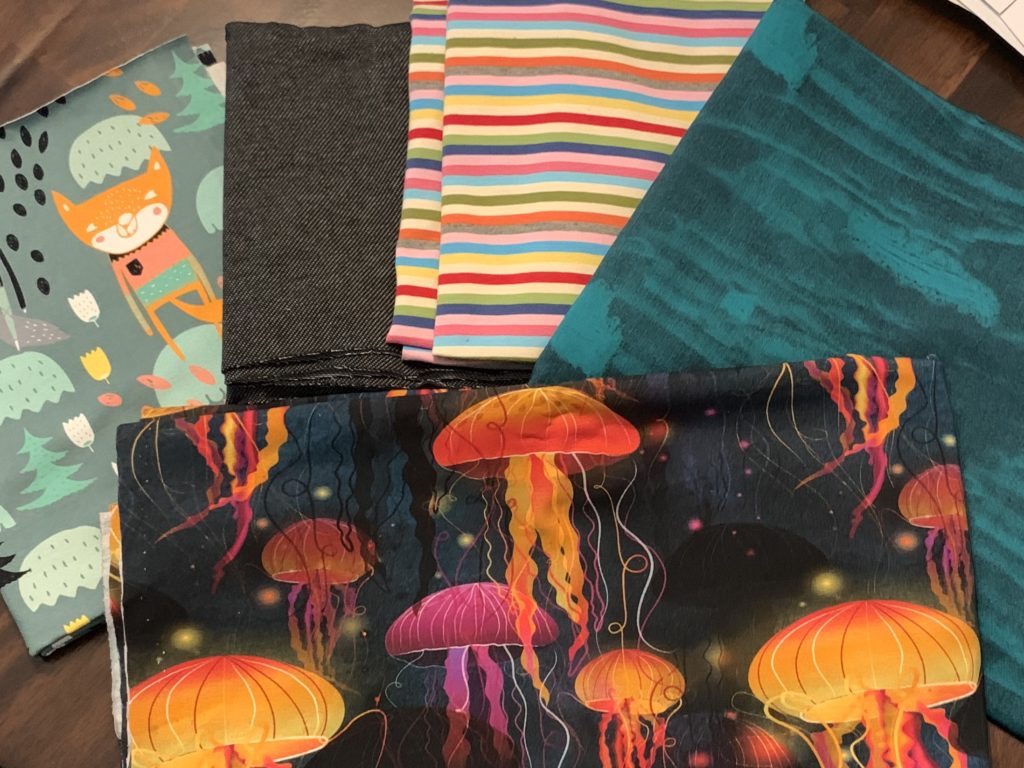
Example of the contents of my most recent seconds-quality “Surprise Pack” from Jumping June
Where to get Patterns
When my mom used to make clothes, she would get patterns from the racks at fabric stores. They still have these, but I always found it hard to find ones that looked fashionable. Now, there are TONS of online pattern shops, and all have great PDF patterns you can print from home and tape together (or order from a copy shop if you prefer it to be plotted). The neat thing about these PDF patterns is you can have it only print the lines for the size (or sizes) you want, instead of having the lines for all sizes, which saves ink/toner and confusion. If you don’t have a cheap black & white laser printer, I highly recommend this one.
Don’t go by your RTW size; always take your measurements and check that specific pattern for sizing.
Definitely the coolest thing about making your own clothes is that you can grade between sizes. Have a M bust and XL hips? Print both lines on your pattern, and grade between them by transitioning from one line to the other around the waist. Now you don’t have to settle for a L that is too big in one place and too small in another. Or, have a toddler with a 4T belly, 2T height, and 18 month hips? ?♀️Now you can have a waistband that fits, without having to cut 4 inches off the legs. P4P has a grading tutorial available here.
When taping pattern pages together, overlap pages and hold it up against a window to line it up (instead of cutting the border off the pages).
Here’s a list of my favorite pattern shops. Worth clicking around them; most have some really good free patterns as well. Some you have to join their Facebook group to get the free pattern codes.
…and many others, but these are the ones I use the most.
How to get started!?
I highly recommend joining some pattern company or fabric shop groups on Facebook; you’ll get to see lots of examples of projects to get ideas, as well as lots of helpful tips and problem solving from the community (and a heads up for sales!). Everyone is very supportive and beginner-friendly. If it’s overwhelming your feed to join all of these, you can turn them off of your feed and just search them when you’re looking for something specific. (The group search function is surprisingly helpful!) Also, I recommend saving pictures (and noting what pattern/fabric it was) when you see something you like. Saves you the trouble of “now what group did I see that in, again??!” searching later. I made a “Things to Sew” album on my phone for them.
my lillestoff – organic fabrics and more – The Facebook group I mentioned to get discounted shipping for their fabric. Also, some of the cutest kids stuff gets posted here.
Also, if you join these groups and we’re Facebook friends, I apologize in advance for the notifications you’re about to get because I post a lot. ?
Add “sew”, “serger”, and “muslin” to your phone’s dictionary/text replacement so it stops making auto-correct fails.
That’s all for now! This post will probably be a work-in-progress as I think of tips to add. As always, feel free to comment or message me if you have specific questions, want a pattern recommendation, etc. I probably won’t add clothing to my photo gallery on this site (being real; one less thing to maintain) but feel free to follow my sewing instagram @texastrumpet to see what I’m up to!
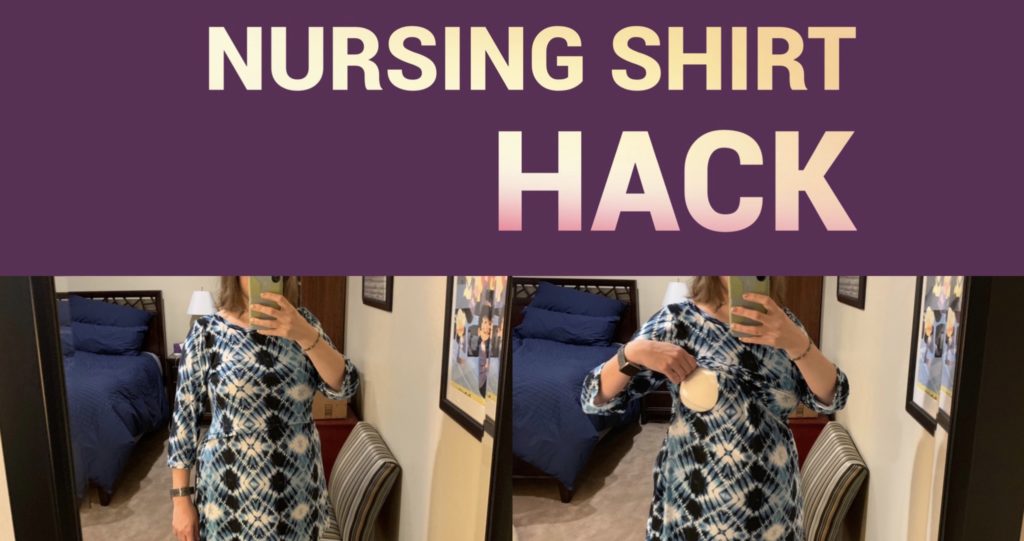
This post explains how I modified a standard knit top pattern (specifically, the Hallå Patterns – Agnes Swing Top) to be a nursing shirt with a lift-up layer and side access. This technique could be used to modify any solid front knit top you’d like, though.
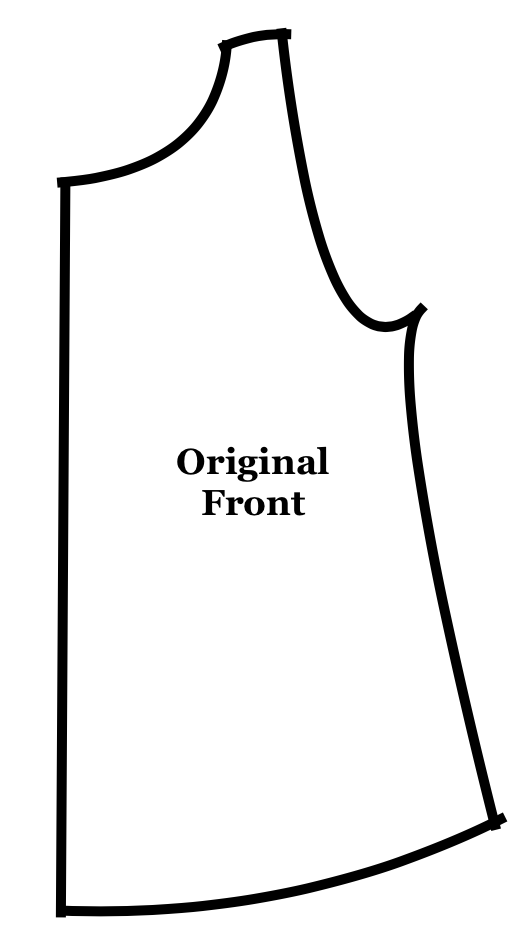
Find a pattern for a knit shirt. Use a fabric that has good stretch recovery and 4 way stretch, like rayon spandex or double brushed poly spandex. Once you’ve found a pattern you’d like to modify, take your measurements and cut out the pattern for the correct size. Print out (or trace) a second copy of the front pattern piece. If they are designed on the fold, they will look something like this:
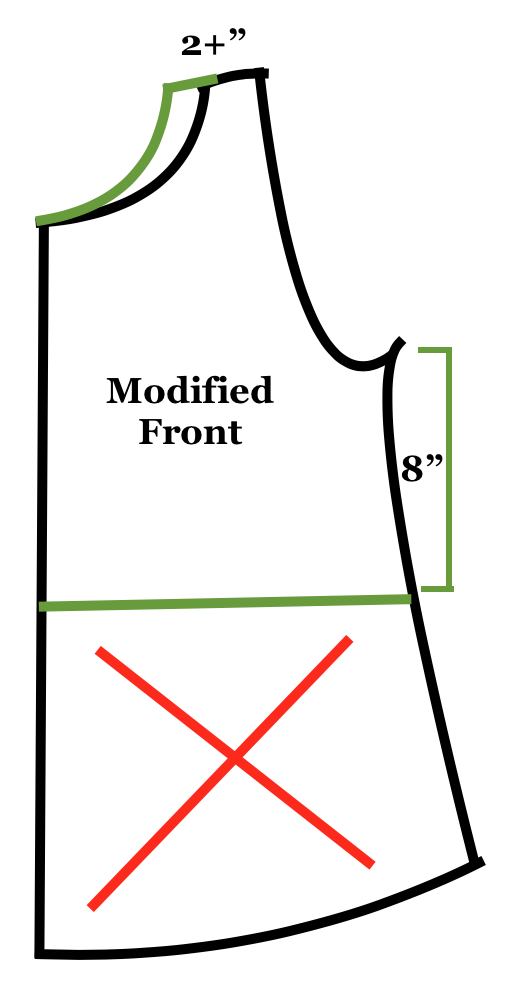
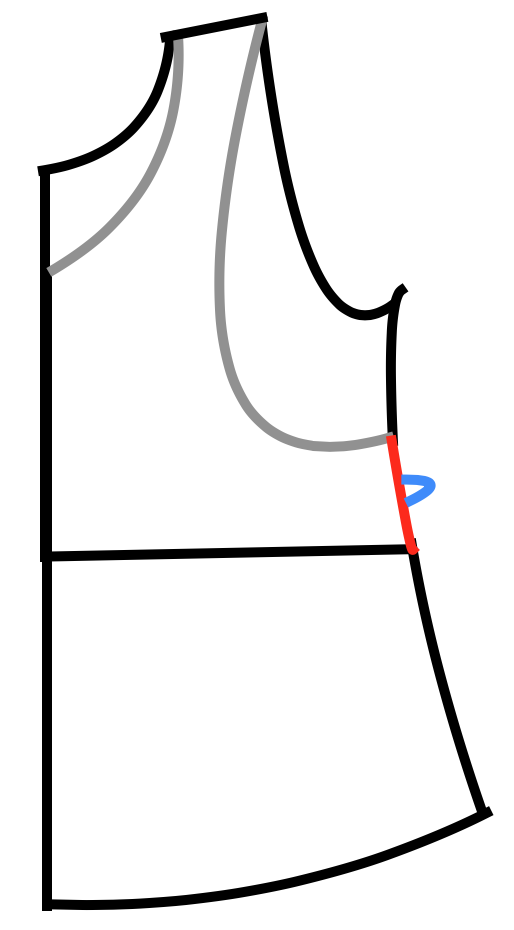
If the shoulder seam on your original pattern is less than 2 inches, adjust the neckline so that the shoulder seam is a bit wider. This will support the weight of the additional layer and prevent it from tearing. Attach scrap paper to draw the extended neck line. Do this on both top pattern pieces, and the back pattern piece to match. On one of your top pattern pieces, cut the bottom half off, approximately 8 inches below the bottom of the armscye. This will become the front overlay:
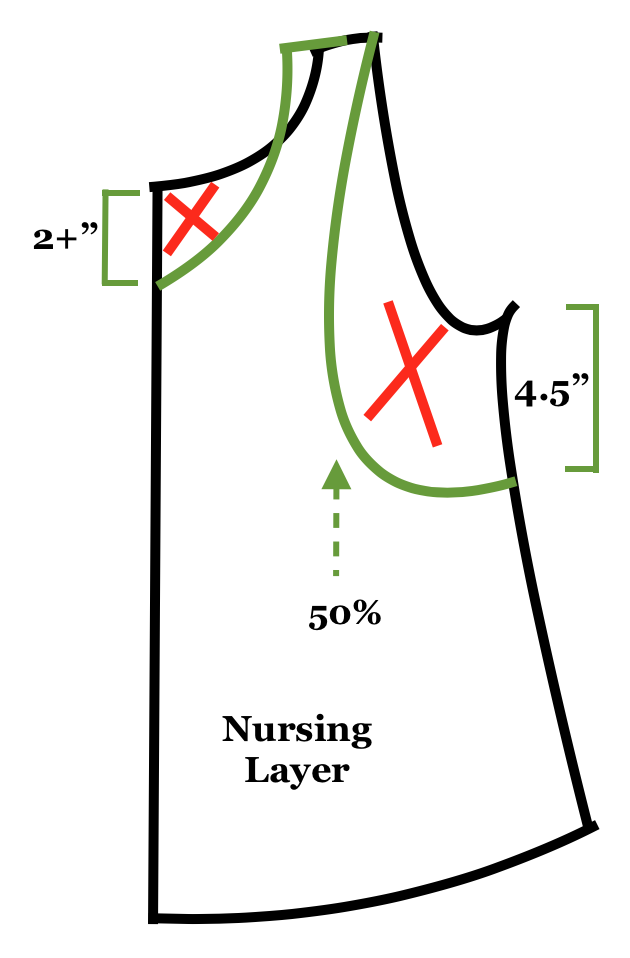
On the other front pattern piece, draw an exaggerated armscye and neck line. The lowest point of the new neckline should be about 2.5 inches below the original neckline, and the bottom of the armscye should be about 4.5″ below the original one, and extend about halfway into the original pattern piece. This piece will be the nursing layer:
I recommend adding a notch in the middle of the side seam so it will be easier to line them up later. Stack your two front pattern pieces on top of each other, and cut or mark a notch on both pattern pieces (below, in blue) in the center of where the side seam will be. Cut out your fabric pieces. If your fabric has a pattern, you may want to fussy cut the front overlay so it matches the same pattern position as the nursing layer, so that it appears to be seamless when stacked.
Fold under and top stitch the flat bottom edge on your front overlay, using a double needle or stretch stitch. I did not hem the edges or neck of the nursing layer since they aren’t visible from the front and I didn’t want to add extra bulk, but you could if you wanted.
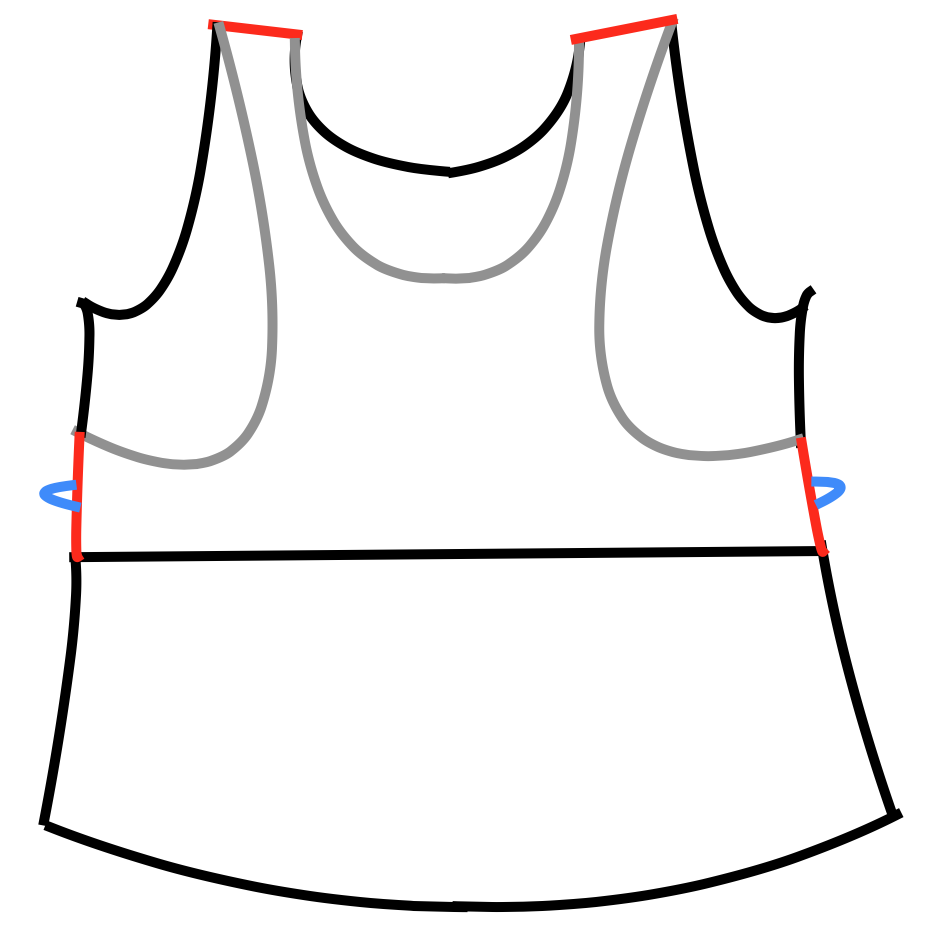
Lay the front overlay on top of the nursing layer (right side facing up for both, like it will look when you wear it). If you have clear elastic, you can add some in the shoulder seams to reinforce them further. Sew the two pieces together at the shoulders, and on the sides (below, in red).
Now that you have your front overlay and nursing layer attached, continue with the original pattern as designed, treating that combined layer as the front piece.
That’s it! Comment if you have any questions, or if this hack worked for you.
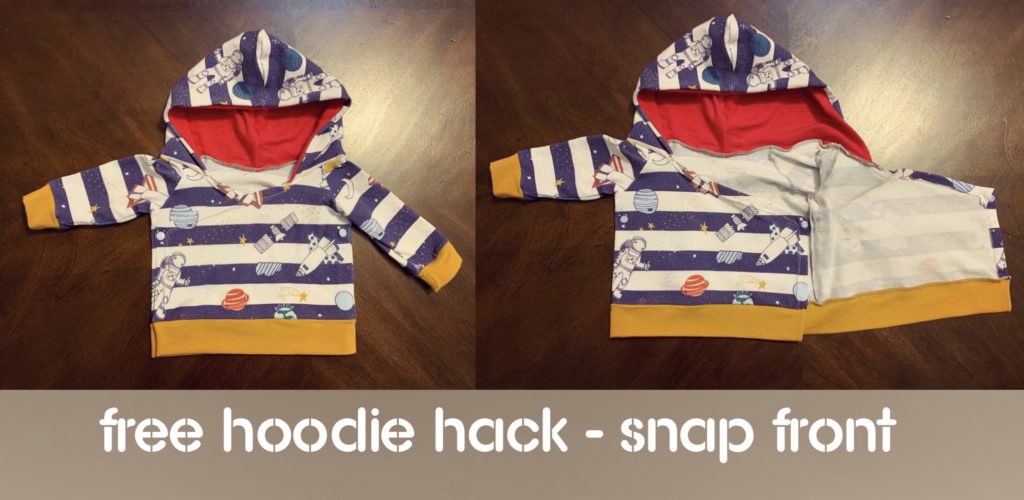
I’ve just finished making a super cute baby modification to the Brindille & Twig Free Raglan Hoodie pattern, which changes the pullover design to have a front panel that snaps. Pictured is the 0-3 month size.
Only modifications to cutting the pattern are to:
Cut an additional front panel
Measure the length of the bottom of your front panel, multiply by 3, and cut your bottom band that length instead of the recommended length
When I got to Step 4 of the pattern (to attach the sleeves, front, and back panels), I started with one front panel, attached a sleeve, attached the back, attached the other sleeve, then attached the other front panel, so instead of a closed ring of pieces, it was an open-ended chain.
Step 5 worked as designed in the pattern, but only attach the side seam for the front panel that is attached to that sleeve (leave the other panel unattached; see top picture.)
Step 6, I attached the wrist cuffs as described. For the waistband, I folded my extra long strip (as mentioned above) in half on the edges, right sides together, and sewed the short ends closed independently. I skipped to step 7, and attached the waistband after.
Step 7, I made the lined hood as described. When it comes to the pinning part, I pinned the back of the hood (where the seam is) in the center of the back panel, and then pinned the rest of the hood where it fell, around the rest of the neck opening. As you can see in the picture, it won’t come close to overlapping, so I removed the pins on the ends of the hood (to about where the raglan sleeve seams were), and folded the opposite corner of the front panel down, and top-stitched a 1/2″ seam down that angle, and down the open edge of each front panel.
Once I had the raw edges folded under and sewn, I trimmed the excess fabric away on the back side that was folded under (if I were to make this pattern repeatedly, I would probably cut my front pattern piece in that shape and cut 2 mirrored pieces, but it’s easy enough to do this as you go that it isn’t necessary). Then I re-pinned the hood, just letting the edges end where they fall, and sew the hood on. One thing to note; since I was using a serger to attach the hood, I wish I had paid more attention to stop sewing right where the hood edge ended, and not keep going past onto the neckline, because that seam is visible from the front. But, if you hadn’t noticed it already, probably no one else will either. ?
I then attached the waistband by turning the corners right-side out, and pinned the band to the bottom of the jacket and sewed down the long side to attach it in a straight line.
For the snaps, I used 2 KAM size 16 snaps, and positioned them on the corners where the front panel seam turns. I did put a 1″ square of fusible interfacing on the back of the panels that were just one layer (my hoodie was made with cotton lycra, so pretty lightweight/stretchy). The other side of the snap that was through the double-thick hem, I didn’t worry about stabilizing.
Hopefully that description helps you if you attempt this hack! Let me know if you have any questions.