I have WordPress installed on my website’s root domain; I wanted to deploy an unrelated React SPA to a subdomain on the same site. The root of the SPA loaded fine, but if I tried to access any routes deeper than the root, I was being served the 404 from my wordpress page.
What I already did:
I set up the application to be served from a subdirectory according to the React Router guidelines:
Updated package.json to have a line for: "homepage": "http://subdomain.eknighmusic.com/myApp"
Updated the Router component to have a basename: <Router basename={'/myApp'}>
Confirmed any links within my app are using the react-router-dom Link component (or useNavigate) instead of a direct “href”
Updated my image source to: img src={`${process.env.PUBLIC_URL}/icon.png`}
This had everything working from localhost, serving from localhost:3000/myApp and looking good; but I was still having this 404 error after deploying a build and navigating to a route.
The solution:
The .htaccess file at my primary domain’s root was taking over and redirecting any unknown (to the server) routes to my 404 page.
I needed to add a new .htaccess file (filename: .htaccess) in my application’s sub-directory on the server (I used cPanel to do this, but you could use FTP or anything you normally use to move files to your server) with the following contents:
If you’re like me, you have a LOT of emails in your inbox. Like, thousands. If you’re also like me, this bothers you, but scrolling through and selectively deleting every email is something you don’t have the time or patience for.
Well, I’ve found a process that helps speed this up, whether you’re trying to sit down and knock it all out at once, or want to just do a little bit each day and make big strides at reducing the clutter.
1. Unsubscribe from mailing lists you don’t care about
This seems obvious enough. (Mostly) gone are the days of being afraid to unsubscribe, because you will be “letting them know” they’ve found a real address. Most companies/individuals use marketing software that will legitimately remove you from the list if you bother to ask.
But what if the emailing lists you are on you do want to receive, so you’re aware of sales, news, updates, etc? Then move on to step 2.
2. Instead of deleting a single email, search your inbox for that term/sender and delete all of the results
The thought is like roaches; if you have one, you probably have a bunch. Now you can save time by deleting things in batches. The trick is to include the in:inbox term to your search phrase. This will make sure you’re only clearing out your inbox; and not your archives or other things you have filed in other folders/labels. It helps to copy “in:inbox” so you can paste it after whatever you type for your next search.
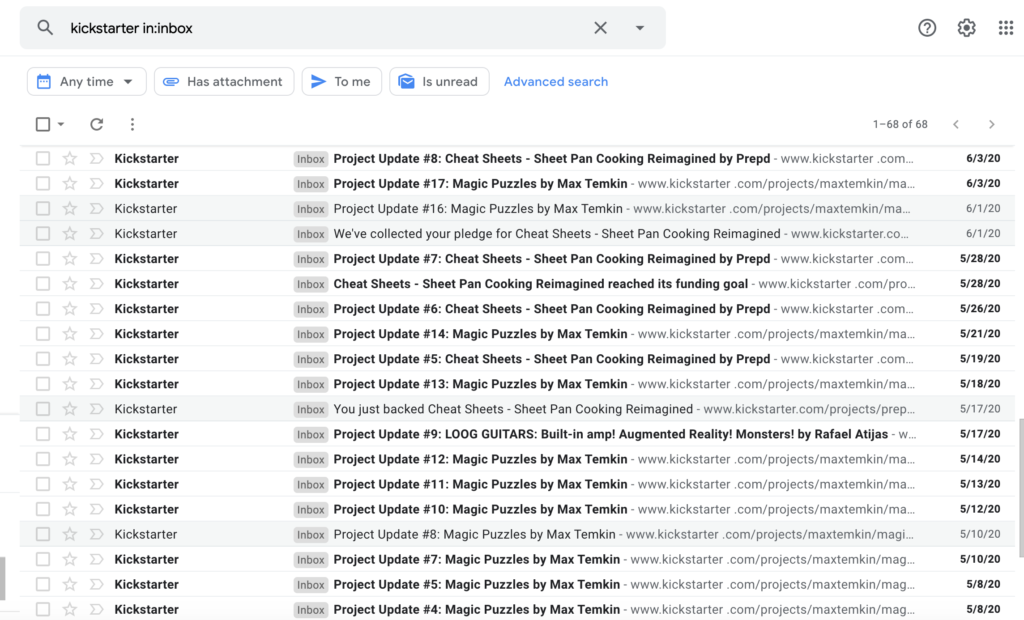
Here I’ve searched for “Kickstarter” (specifically, kickstarter in:inbox). Sometimes I care about these updates when they arrive; usually not. Select all, scroll through the list and de-select anything that you don’t want to delete, and hit that satisfying “delete” button.
LOTS of emails to delete at once. Hooray!
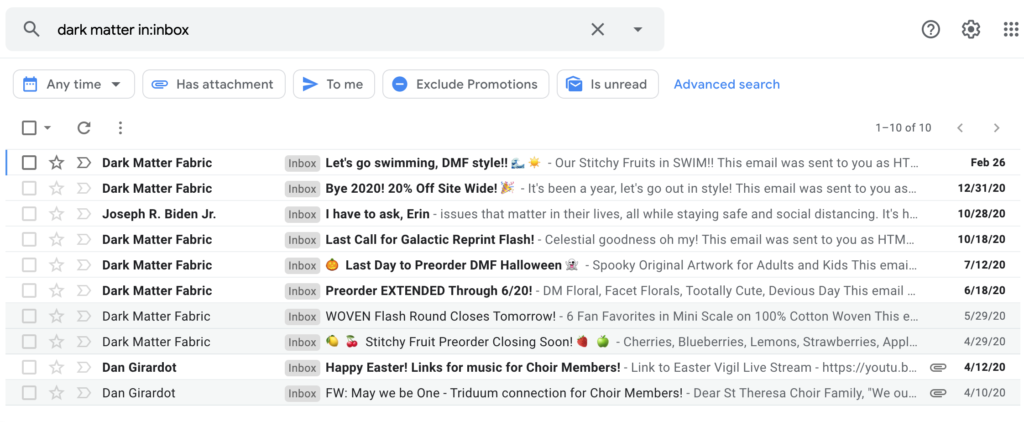
Sometimes this process works perfectly, and you want to delete everything that comes up. Sometimes, your search term turns up some other results. This is actually a good thing, if they happen to be other junk I care to delete. But if the term was too vague and is taking too long to scan for “do I delete it or not?”, the you can also add from: in your search term (like from:kickstarter in:inbox) to narrow it down specifically to that sender. I generally like casting a wide net though, because then i’m clearing out bigger chunks at once than necessarily searching for each sender individually. This can also give you a hint of what term to search for next (definitely going to try Bidenin:inbox).
Example of a search term that happened to returned several unexpected results
Then, once you’ve deleted everything appropriate for that term, if there are still any items hanging on that you did want to keep, select all and hit archive. Now everything related to that term is gone from your inbox.
3. It’s ok to let it go 😅
This one, if you’re like me, is sometimes the hardest. I’ll admit, I do archive receipts, order tracking, account creation, etc., because occasionally I do need to search “when did I buy that thing?” or “why hasn’t X shown up yet”. But the confirmation of a Zoom meeting I had once? Yeah let that go. Once you start deleting, it feels pretty good.
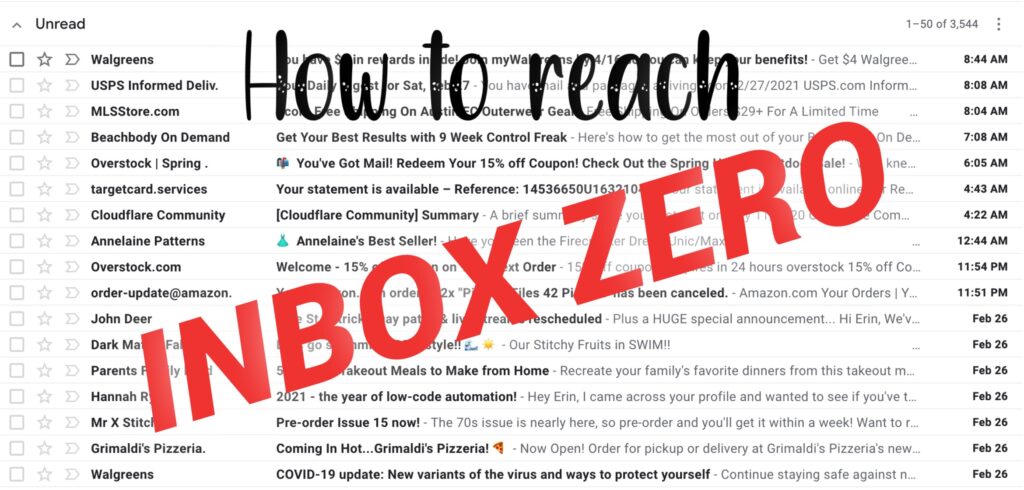
And that’s really all there is to it! This process is simple and addictive once you see your inbox number dropping hundreds at a time. If you just want to add this habit into your daily routine to clear it out a little at a time, then instead of deleting today’s single junk emails, search your inbox and delete all related junk emails. You can set a daily target inbox number if you want; like today I want to get it below 4500. Then tomorrow, 4000. And without specifically investing a huge chunk of time, you, too, can reach inbox zero.
Or, you may be hooked to the process and knock it all out at once. It goes surprisingly quickly once you get the hang of it! Good luck conquering your towering inboxes.
This post explains how I modified a standard knit top pattern (specifically, the Hallå Patterns – Agnes Swing Top) to be a nursing shirt with a lift-up layer and side access. This technique could be used to modify any solid front knit top you’d like, though.
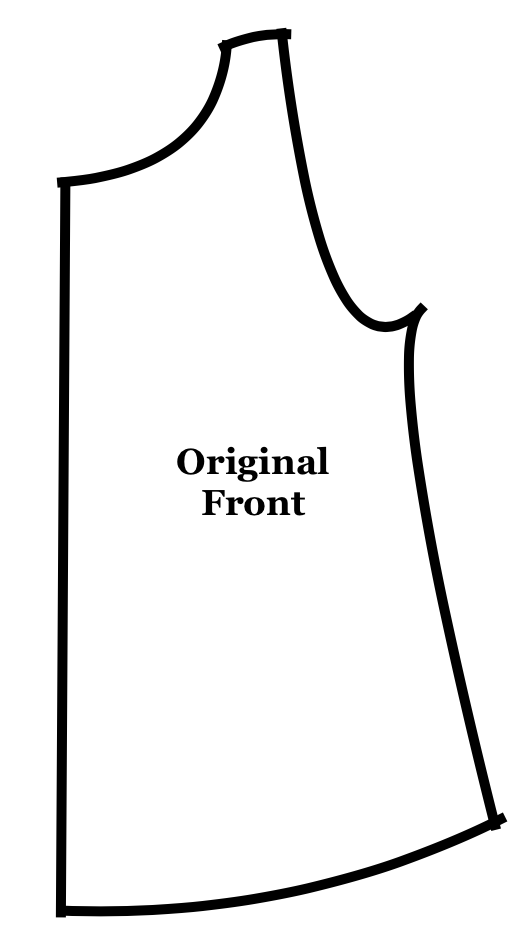
Find a pattern for a knit shirt. Use a fabric that has good stretch recovery and 4 way stretch, like rayon spandex or double brushed poly spandex. Once you’ve found a pattern you’d like to modify, take your measurements and cut out the pattern for the correct size. Print out (or trace) a second copy of the front pattern piece. If they are designed on the fold, they will look something like this:
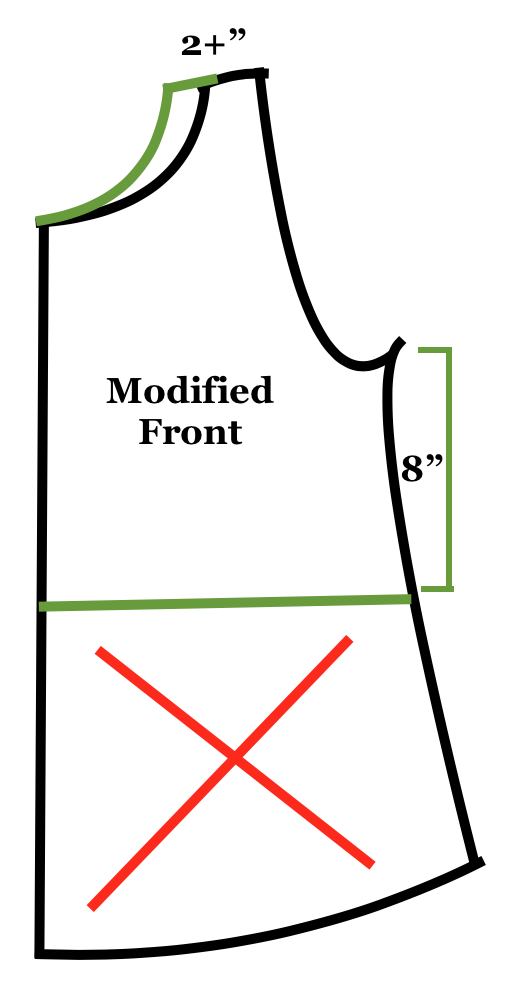
If the shoulder seam on your original pattern is less than 2 inches, adjust the neckline so that the shoulder seam is a bit wider. This will support the weight of the additional layer and prevent it from tearing. Attach scrap paper to draw the extended neck line. Do this on both top pattern pieces, and the back pattern piece to match. On one of your top pattern pieces, cut the bottom half off, approximately 8 inches below the bottom of the armscye. This will become the front overlay:
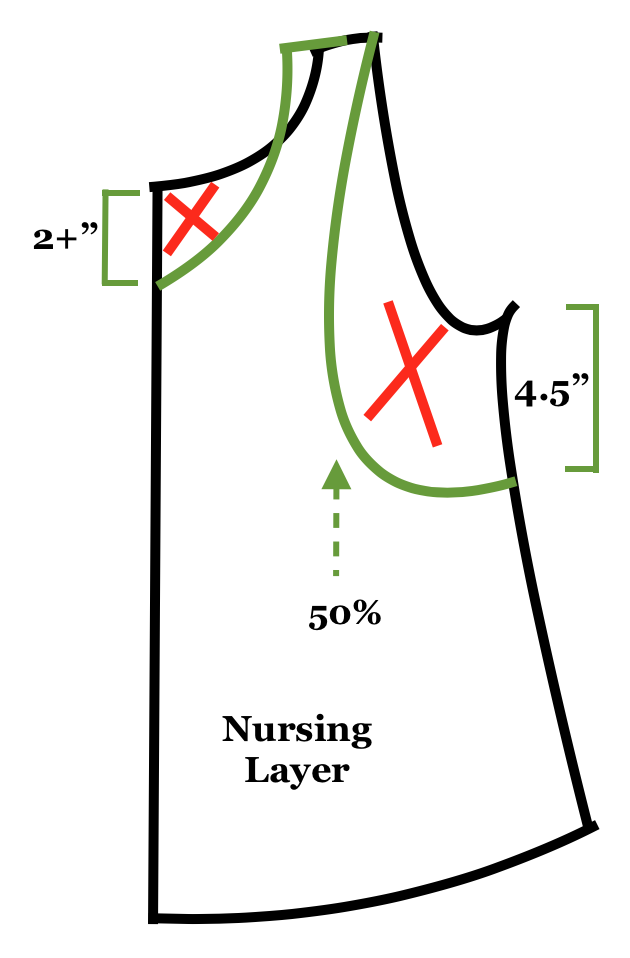
On the other front pattern piece, draw an exaggerated armscye and neck line. The lowest point of the new neckline should be about 2.5 inches below the original neckline, and the bottom of the armscye should be about 4.5″ below the original one, and extend about halfway into the original pattern piece. This piece will be the nursing layer:
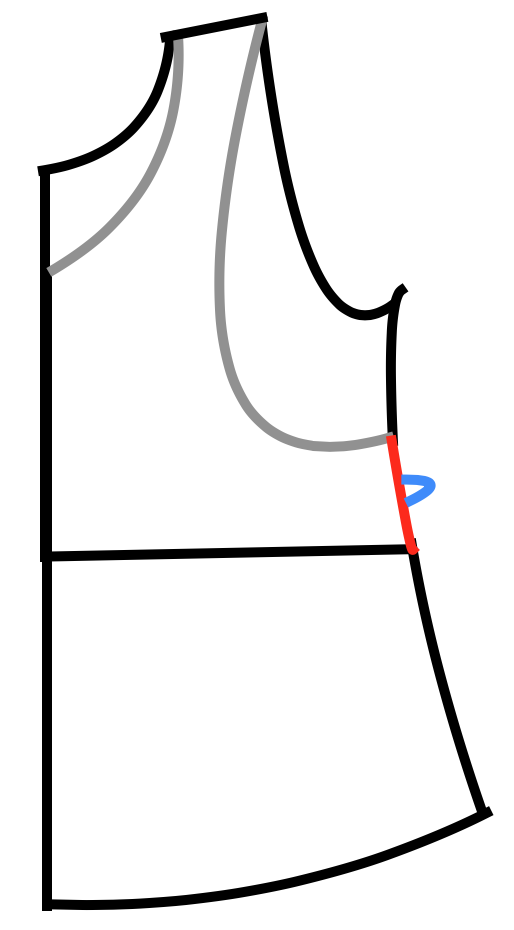
I recommend adding a notch in the middle of the side seam so it will be easier to line them up later. Stack your two front pattern pieces on top of each other, and cut or mark a notch on both pattern pieces (below, in blue) in the center of where the side seam will be. Cut out your fabric pieces. If your fabric has a pattern, you may want to fussy cut the front overlay so it matches the same pattern position as the nursing layer, so that it appears to be seamless when stacked.
Fold under and top stitch the flat bottom edge on your front overlay, using a double needle or stretch stitch. I did not hem the edges or neck of the nursing layer since they aren’t visible from the front and I didn’t want to add extra bulk, but you could if you wanted.
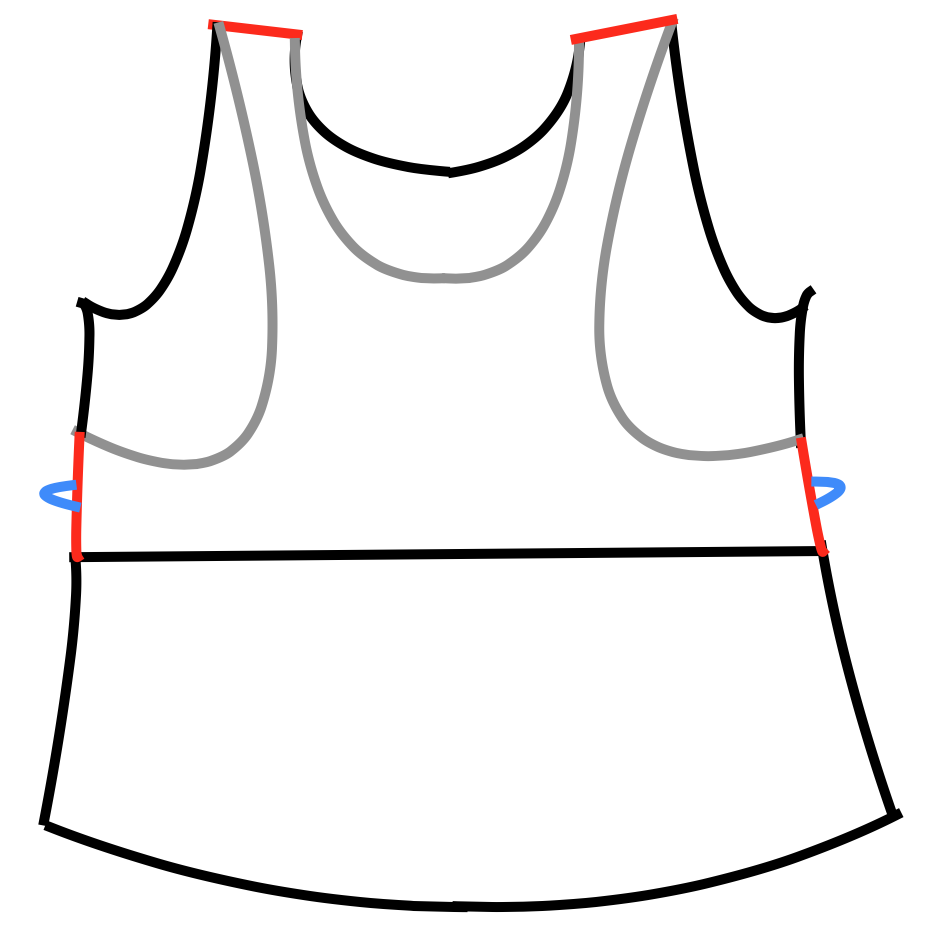
Lay the front overlay on top of the nursing layer (right side facing up for both, like it will look when you wear it). If you have clear elastic, you can add some in the shoulder seams to reinforce them further. Sew the two pieces together at the shoulders, and on the sides (below, in red).
Now that you have your front overlay and nursing layer attached, continue with the original pattern as designed, treating that combined layer as the front piece.
That’s it! Comment if you have any questions, or if this hack worked for you.
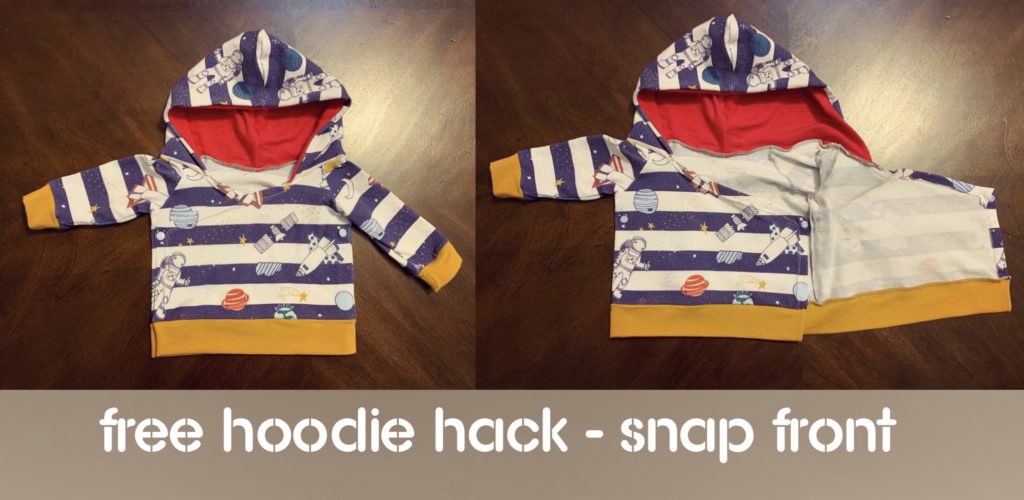
I’ve just finished making a super cute baby modification to the Brindille & Twig Free Raglan Hoodie pattern, which changes the pullover design to have a front panel that snaps. Pictured is the 0-3 month size.
Only modifications to cutting the pattern are to:
Cut an additional front panel
Measure the length of the bottom of your front panel, multiply by 3, and cut your bottom band that length instead of the recommended length
When I got to Step 4 of the pattern (to attach the sleeves, front, and back panels), I started with one front panel, attached a sleeve, attached the back, attached the other sleeve, then attached the other front panel, so instead of a closed ring of pieces, it was an open-ended chain.
Step 5 worked as designed in the pattern, but only attach the side seam for the front panel that is attached to that sleeve (leave the other panel unattached; see top picture.)
Step 6, I attached the wrist cuffs as described. For the waistband, I folded my extra long strip (as mentioned above) in half on the edges, right sides together, and sewed the short ends closed independently. I skipped to step 7, and attached the waistband after.
Step 7, I made the lined hood as described. When it comes to the pinning part, I pinned the back of the hood (where the seam is) in the center of the back panel, and then pinned the rest of the hood where it fell, around the rest of the neck opening. As you can see in the picture, it won’t come close to overlapping, so I removed the pins on the ends of the hood (to about where the raglan sleeve seams were), and folded the opposite corner of the front panel down, and top-stitched a 1/2″ seam down that angle, and down the open edge of each front panel.
Once I had the raw edges folded under and sewn, I trimmed the excess fabric away on the back side that was folded under (if I were to make this pattern repeatedly, I would probably cut my front pattern piece in that shape and cut 2 mirrored pieces, but it’s easy enough to do this as you go that it isn’t necessary). Then I re-pinned the hood, just letting the edges end where they fall, and sew the hood on. One thing to note; since I was using a serger to attach the hood, I wish I had paid more attention to stop sewing right where the hood edge ended, and not keep going past onto the neckline, because that seam is visible from the front. But, if you hadn’t noticed it already, probably no one else will either. ?
I then attached the waistband by turning the corners right-side out, and pinned the band to the bottom of the jacket and sewed down the long side to attach it in a straight line.
For the snaps, I used 2 KAM size 16 snaps, and positioned them on the corners where the front panel seam turns. I did put a 1″ square of fusible interfacing on the back of the panels that were just one layer (my hoodie was made with cotton lycra, so pretty lightweight/stretchy). The other side of the snap that was through the double-thick hem, I didn’t worry about stabilizing.
Hopefully that description helps you if you attempt this hack! Let me know if you have any questions.
Out of the box, ASP.NET’s JavaScriptServices app generator has gotten pretty good. It gives you a decent starting point (if you like TypeScript) and even has a react-redux template. It doesn’t, however, come with any css extensions like SASS. There’s a not very user-friendly description in the docs of how to add it, but here’s the quick and dirty of how to add SASS to your project.
Disclaimer: This will not include hot module reloading for the scss files. ? This is very lame, but it’s discussed here that it’s better to build your css the same way in dev and prod (rather than using different loaders for the two environments), so until there’s a valid loader that can do both, this is the method they recommend.
Install the required modules Using npm:
npm install --save-dev node-sass sass-loader
Update the webpack config(s) Find the rules block in your webpack config that are testing for /\.css$/ files. Modify that line to:
Rename your file(s) The default app has a file called “site.css” in the /css folder. Rename this to “site.scss”.
Update your reference
Wherever you are including your css into your app (by default, it’s in boot-client.tsx), change that reference to match your new file name:
import './css/site.scss';
Psst: DON’T change the file name in your webpack.config passed to the ExtractTextPlugin; that is specifying the name of the output file.
Run your app, and load in a browser Run on the command line by using “dotnet run”, then open a browser to localhost:5000, or whichever port is specified. If your app is building in Production mode (it will say in the blurb when it boots up), then you can set the environment flag by running:
SET ASPNETCORE_ENVIRONMENT=Development
Add some SASS At the top of your new .scss file, test it out by adding a variable, and then abuse that variable:
$hideous-color: #f0f;

body {
    background-color: $hideous-color;
}
Reload your app in the browser
You are now cookin’ with SASS. Terrible pun intended.