Blog

21 Day Fix – Meal Planning Week 1

Wow, long time, no blog. I have decided to do a 21 Day Fix challenge this December, and I just completed my first round of meal planning and prepping for the upcoming week. Phew! Lots of work, stress, and work. (I know I said that twice.) After planning for about an hour an a half, when Mark asked why I didn’t plan X, I threw a mini temper tantrum and threw my binder. Luckily, Amy is adorable and went and got it and handed it back to me sweetly.

SO, what came of all of that planning? I’m going to document it here in case anyone wants to steal it and save the hours of planning, or in case I want to reference it in the future. I’ll break down below what I’m making (and what categories they are), what recipes I’m using, and what I plan to prep in advance.

To start with, I printed off the free weekly planning sheet from Sublime Reflection for my target calorie range.

So, what’s on the menu?

21 Day Fix meal plan, ~1300 calories/day

Monday:

  • Breakfast: 2 eggs, carrots & celeryRG
  • Snack: Yogurt, 1/2 portion strawberries (don’t have my Shakeology yet)RP
  • Lunch: Grilled chicken, quinoa salad with spinach and peachesRYGP
  • Snack: Pumpkin seeds, almondsOB
  • Dinner: Salmon, roasted asparagus, mashed sweet potatoesRGY
  • Snack: StrawberriesP

Tuesday:

  • Breakfast: YogurtR
  • Snack: Shakeology (hopefully!)R
  • Lunch: Salad, tangerines, peanut butter celeryGGP
  • Snack: BlueberriesP
  • Dinner: Eating out at Zoe’s kitchen (hummus, cucumber, chicken kabobs, pita, salad)RGBY
  • Snack: Dark chocolate chips, 1/2 portion peanutsYO

Wednesday:

  • Breakfast: 2 eggs, 1/2 portion blueberriesRP
  • Snack: ShakeologyR
  • Lunch: Grilled chicken, quinoa salad with spinach and peachesRGYP
  • Snack: Carrots/celery, pumpkin seedsGO
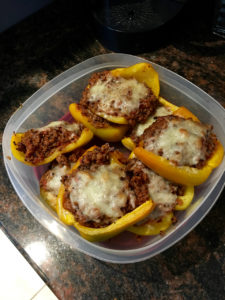
  • Dinner: Stuffed bell peppersRGYB
  • Snack: StrawberriesP

Thursday:

  • Breakfast: Yogurt, blueberriesRP
  • Snack: Shakeology + peanut butterR
  • Lunch: Stuffed bell peppersRGYB
  • Snack: Carrot/celery/cucumberG
  • Dinner: Teriyaki Beef, sesame seeds, steamed broccoli, brown riceRGYO
  • Snack: StrawberriesP

Friday:

  • Breakfast: 2 eggsR
  • Snack: Shakeology + blueberriesRP
  • Lunch: (Work-catered) TamalesRGYOB
  • Snack: Cherry tomatoes, cucumberG
  • Dinner: Meatloaf, potatoes, roasted carrots and asparagusRGY
  • Snack: StrawberriesP

Saturday

  • Breakfast: YogurtR
  • Snack: Shakeology + peanut butterR
  • Lunch: SaladG
  • Snack: Tangerines, carrots/celeryGP
  • Dinner: Christmas Party ?RGYY
  • Snack: ^^OPB

Sunday

  • Breakfast: 2 eggs, whole-grain waffleRY
  • Snack: ShakeologyR
  • Lunch: Turkey burger lettuce wrap, carrotsRG
  • Snack: Another Christmas Party ?GOP
  • Dinner: ^^RYBG
  • Snack: StrawberriesP

Sounds great! How do I do that?

Sunday meal prep:

We grocery shopped for all the ingredients, then:

Pre-cook eggs for the week. I followed Savor+Savvy’s recipe, and will microwave them for 30-45 seconds on the morning I plan to eat them.

Cook the Stuffed Bell Peppers to eat for Wednesday dinner and Thursday lunch. Used Hello Fresh’s recipe, which includes quinoa, ground beef, crushed tomatoes, and cheese.

Pound flat and grill (or prepare in your preferred way) chicken breasts for Monday/Wednesday lunches.

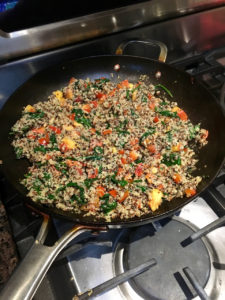
Cook quinoa (we used our new Instant Pot for 1 minute quinoa.) I combined two recipes for this one. We used a cup of quinoa, 1 red bell pepper, 1 peach, 2 cloves of garlic, 4 oz spinach, and a lime. We added the lime zest to the uncooked quinoa, and then added the lime juice into the cooked quinoa. Cook chopped bell pepper and garlic in a large skillet. After a couple minutes, add in the spinach and cover. When it starts to wilt, add in the cooked quinoa, stir, and cook until warmed through and spinach wilts a bit more. Turn off the heat and stir in chopped peaches.

I also chopped up the “rabbit food” (veggies) for snacks and put them in baggies. I personally don’t like ranch or dressings, so it works out that I don’t have to budget for them in my meal plans. I portioned out the nuts and seeds in baggies, as well.

I’ll follow up after this week with how this week went, and what I plan to do next week!

Recipes for later in the week:

We’ll be doing a couple other Hello Fresh recipes, substituting the bok choy for steamed broccoli in the Sesame Teriyaki Beef, and Meatloaf À La Mom.


How To Delete iPhone Photos Except Favorites

Since I have a new baby, it’s no surprise that my iPhone is out of storage. I have backed everything up on my computer (and Google Photos as a back-up backup) so it’s time to delete them off of my phone. Except I don’t want to delete ALL of them; I have several albums I’d like to keep, and specifically, photos I’ve marked as “favorites” I’d like to keep after the purge.

How do you do this without deleting photos one by one? It’s a multi-step process.

  1. Hide the photos you want to keep
  2. Select all (unhidden photos) and delete
  3. Un-hide the photos you wanted to keep and you’re done!

Here’s a breakdown.

Hide the photos you want to keep

There are a couple ways to do this on my current iOS (iOS 10.2). If you want to hide an entire album, open that album in the Photos app (on your phone), click “Select”, and click “Select All”. Then click the export icon, and at the bottom of the export screen there’s a “Hide” option. Do this for any albums you want to keep, including Favorites.

If you’d rather hide a single photo, tap on it to view as normal, and click the export icon. Then you can click the hide icon at the bottom.

Delete the ones you don’t

If you’re in “Albums,” including “Camera Roll,” you will still see your hidden photos. Go to “Photos” on the bottom to hide your hidden photos. Then click a category until you see the “Select” option appear at the top. Click “Select”, then click “Select” next to each day until you have selected everything you want to delete. You can hit the trash icon periodically to delete what you have selected so far. This is also a handy way to un-select anything you missed hiding but still want to save. Be sure to tap the trash can at the end to delete everything you have selected. I wish there was a way to “Select All” that are remaining; if you figure out a way, post a comment!

To clear out the space on your phone immediately, go back to Albums, and Recently Deleted. Click “Select” then “Delete All” to remove them permanently. If you’re nervous, you can save this step until after you unhide the ones you’re saving.

Unhide your photos

You’re almost done! Click on the Hidden album, “Select”, “Select All”, export icon, and “Unhide”. Now they should all be visible again in your Collections.

Success! Storage space achieved.

Connect 4 – on paper!

I wanted to bring the game Connect Four to work, but then realized I don’t actually own the game. I forgot to go buy it, and now I was stuck with no game and a game time coming up. Solution? Print a game board on paper, and draw it using X’s and O’s as the pieces. Works great!

I imagine this will be useful to have on hand as a “travel” version of the game, with no pieces to drop and lose.

Connect 4

Here’s a downloadable PDF of the game board I drew, with 2 printed per sheet. If you wanted even smaller boards to save paper, you could print multiple copies of the PDF on one page.

Three Little Birds

Singing’ don’t worry about a thing
‘Cause every little thing gonna be alright

This post is somewhat a response to my other recent post, Real Talk.

Way back in 2012, when I was feeling really conflicted about my career and life in general, I made my way to my first Austin Ukulele Society meeting. I didn’t really want to go… I didn’t know anyone that would be there, I felt like I had other things to do with my time, but I got myself out the door and to the meeting. The very first thing that happened was we sang Bob Marley’s “Three Little Birds”. I could have cried from the happiness/relief that singing that one simple song gave me. Seriously; everything will be alright. It’s so easy to get hung up on the things that are bringing you down, and this song helps me let go of that and just be happy in the moment.

When I saw my doctor last, things were looking slightly better than they had been, but still a long way to go. She extended my leave from work by another couple weeks. I had mixed feelings about the outcome, because I know while it’s good to be making progress, I feel like it will take going back to work to be really back on track. When I got in my car to leave, this song started playing (on 101x; particularly odd). I smiled and drove home. When I got there, I turned on Amy’s Baby Einstein Pandora station, and this song came on again! I really felt like it was a sign to chill out, breathe, and take things as they come. It will be alright.

Yesterday I got a call from my insurance that after weeks of going back and forth, they finally approved my disability claim. Tonight I was able to take Amy for her evening walk, the first exercise I’ve had in a long time. Also, Amy has been sleeping in her crib for almost a week, and I haven’t died of sleep deprivation like I feared. Finally, I have kept this tiny human alive for 4 months next week. Here’s to many more.

DIY – Caulking Large Gaps

In both of our houses, we have had the need to caulk a large gap. One was a poorly installed countertop, the other a tub. In one case the wall was bowed, causing one or more spots to be larger than the rest.

If you try to just fill these gaps with silicone caulk, there’s nothing for it to grab on to, and as it dries it caves in. So what do you do about it?

Turns out there’s a magic solution called a backer rod. It’s a soft foam tube in various sizes that you cut and stuff into the gaps (1/4 inch down) so you can caulk on top of it.

br1

Tub gap with old caulk removed, and with backer rod inserted

br2Now you can cover gaps to you heart’s content! (awaiting cleanup)

br3