Nursing Shirt Hack

This post explains how I modified a standard knit top pattern (specifically, the Hallå Patterns – Agnes Swing Top) to be a nursing shirt with a lift-up layer and side access. This technique could be used to modify any solid front knit top you’d like, though.

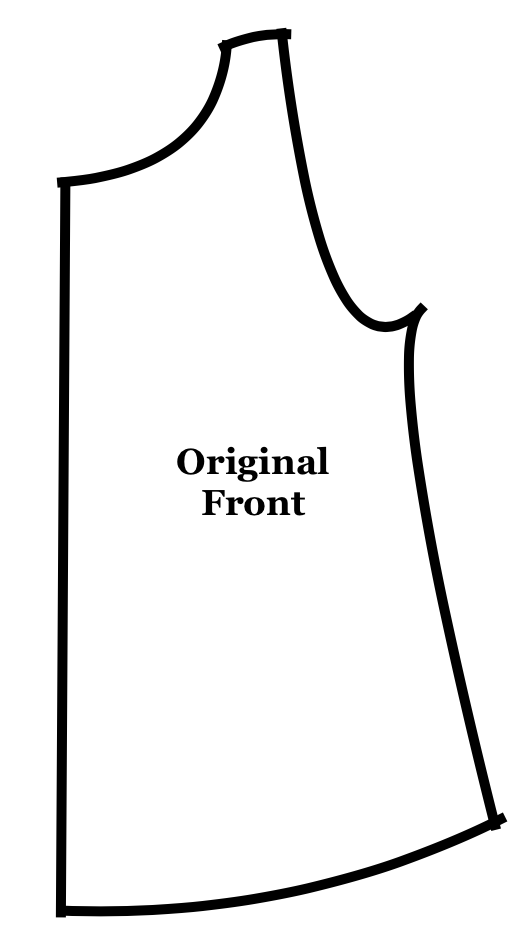
Find a pattern for a knit shirt. Use a fabric that has good stretch recovery and 4 way stretch, like rayon spandex or double brushed poly spandex. Once you’ve found a pattern you’d like to modify, take your measurements and cut out the pattern for the correct size. Print out (or trace) a second copy of the front pattern piece. If they are designed on the fold, they will look something like this:

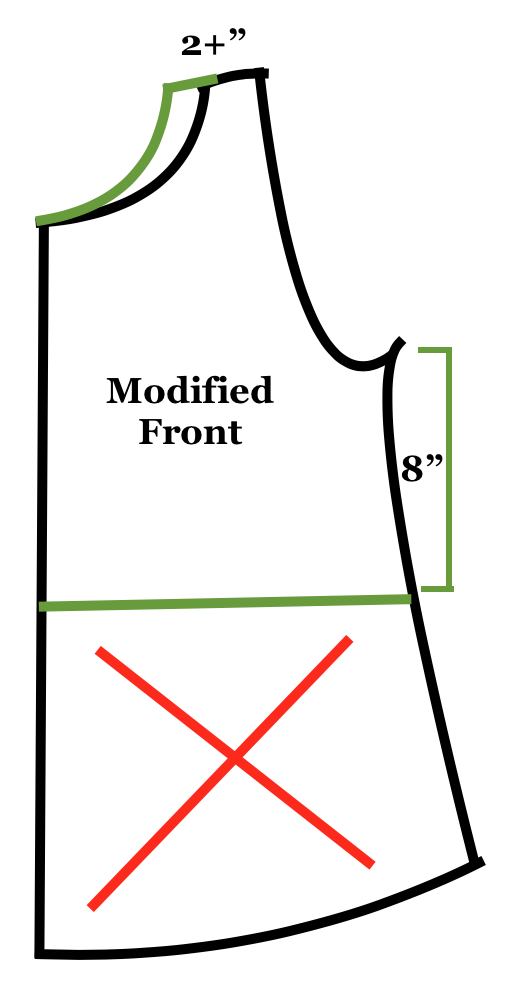
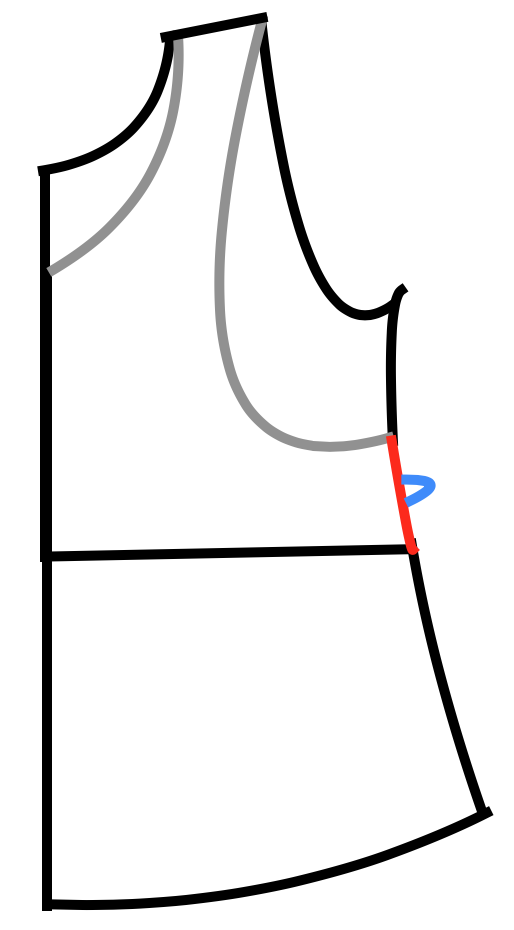
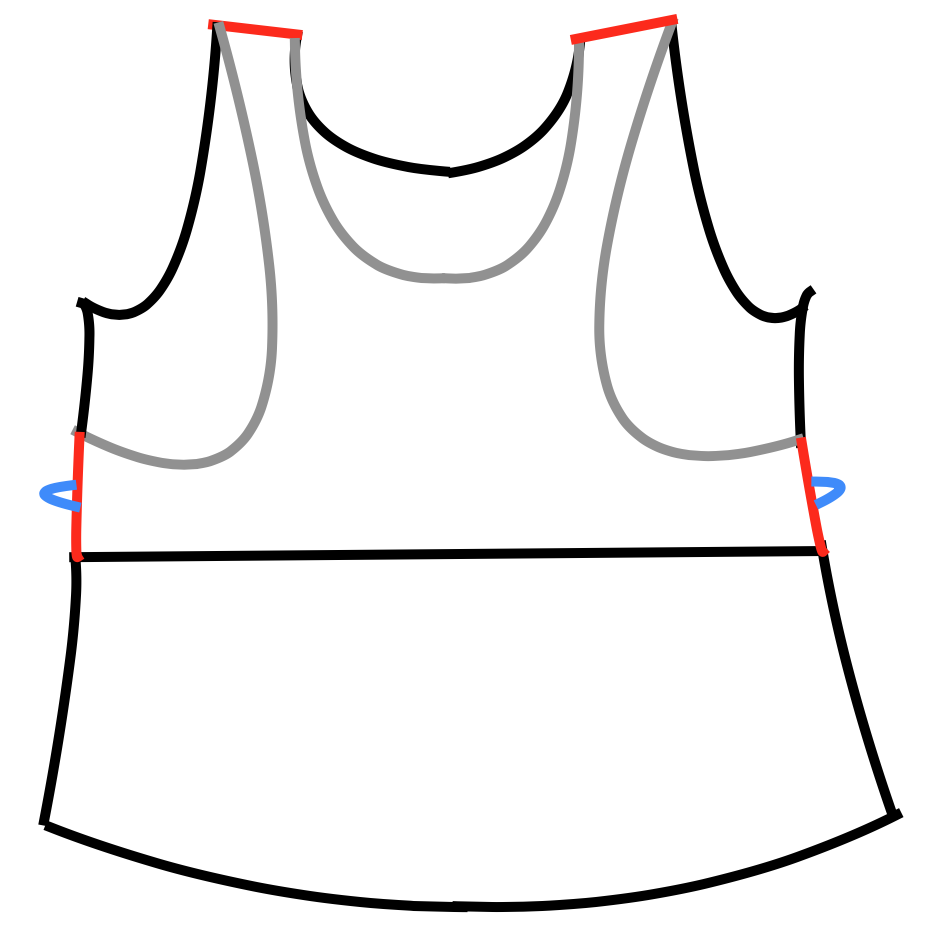
If the shoulder seam on your original pattern is less than 2 inches, adjust the neckline so that the shoulder seam is a bit wider. This will support the weight of the additional layer and prevent it from tearing. Attach scrap paper to draw the extended neck line. Do this on both top pattern pieces, and the back pattern piece to match. On one of your top pattern pieces, cut the bottom half off, approximately 8 inches below the bottom of the armscye. This will become the front overlay:

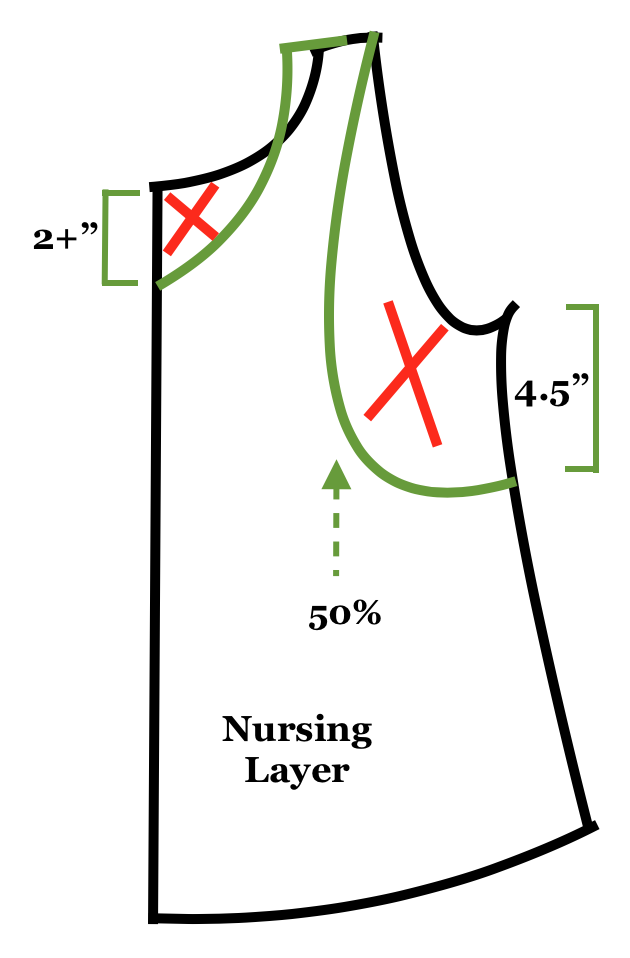
On the other front pattern piece, draw an exaggerated armscye and neck line. The lowest point of the new neckline should be about 2.5 inches below the original neckline, and the bottom of the armscye should be about 4.5″ below the original one, and extend about halfway into the original pattern piece. This piece will be the nursing layer:

I recommend adding a notch in the middle of the side seam so it will be easier to line them up later. Stack your two front pattern pieces on top of each other, and cut or mark a notch on both pattern pieces (below, in blue) in the center of where the side seam will be. Cut out your fabric pieces. If your fabric has a pattern, you may want to fussy cut the front overlay so it matches the same pattern position as the nursing layer, so that it appears to be seamless when stacked.

Fold under and top stitch the flat bottom edge on your front overlay, using a double needle or stretch stitch. I did not hem the edges or neck of the nursing layer since they aren’t visible from the front and I didn’t want to add extra bulk, but you could if you wanted.

Lay the front overlay on top of the nursing layer (right side facing up for both, like it will look when you wear it). If you have clear elastic, you can add some in the shoulder seams to reinforce them further. Sew the two pieces together at the shoulders, and on the sides (below, in red).

Now that you have your front overlay and nursing layer attached, continue with the original pattern as designed, treating that combined layer as the front piece.

That’s it! Comment if you have any questions, or if this hack worked for you.

B&T Free Hoodie Hack – Snap Panel Front

I’ve just finished making a super cute baby modification to the Brindille & Twig Free Raglan Hoodie pattern, which changes the pullover design to have a front panel that snaps. Pictured is the 0-3 month size.

Only modifications to cutting the pattern are to:

  1. Cut an additional front panel
  2. Measure the length of the bottom of your front panel, multiply by 3, and cut your bottom band that length instead of the recommended length

When I got to Step 4 of the pattern (to attach the sleeves, front, and back panels), I started with one front panel, attached a sleeve, attached the back, attached the other sleeve, then attached the other front panel, so instead of a closed ring of pieces, it was an open-ended chain.

Step 5 worked as designed in the pattern, but only attach the side seam for the front panel that is attached to that sleeve (leave the other panel unattached; see top picture.)

Step 6, I attached the wrist cuffs as described. For the waistband, I folded my extra long strip (as mentioned above) in half on the edges, right sides together, and sewed the short ends closed independently. I skipped to step 7, and attached the waistband after.

Step 7, I made the lined hood as described. When it comes to the pinning part, I pinned the back of the hood (where the seam is) in the center of the back panel, and then pinned the rest of the hood where it fell, around the rest of the neck opening. As you can see in the picture, it won’t come close to overlapping, so I removed the pins on the ends of the hood (to about where the raglan sleeve seams were), and folded the opposite corner of the front panel down, and top-stitched a 1/2″ seam down that angle, and down the open edge of each front panel.

Once I had the raw edges folded under and sewn, I trimmed the excess fabric away on the back side that was folded under (if I were to make this pattern repeatedly, I would probably cut my front pattern piece in that shape and cut 2 mirrored pieces, but it’s easy enough to do this as you go that it isn’t necessary). Then I re-pinned the hood, just letting the edges end where they fall, and sew the hood on. One thing to note; since I was using a serger to attach the hood, I wish I had paid more attention to stop sewing right where the hood edge ended, and not keep going past onto the neckline, because that seam is visible from the front. But, if you hadn’t noticed it already, probably no one else will either. ?

I then attached the waistband by turning the corners right-side out, and pinned the band to the bottom of the jacket and sewed down the long side to attach it in a straight line.

For the snaps, I used 2 KAM size 16 snaps, and positioned them on the corners where the front panel seam turns. I did put a 1″ square of fusible interfacing on the back of the panels that were just one layer (my hoodie was made with cotton lycra, so pretty lightweight/stretchy). The other side of the snap that was through the double-thick hem, I didn’t worry about stabilizing.

Hopefully that description helps you if you attempt this hack! Let me know if you have any questions.